Secure GitHub CI/CD to AWS with OIDC

I’m a DevOps Engineer but yet my personal website does not have CI/CD - Let’s fix that.
Table of contents
- Table of contents
- Introduction
- What is AWS OIDC
- AWS Identity Provider
- AWS Role
- GitHub Action
- Testing
- Cloudfront Distribution Invalidation Step
- Conclusion
Introduction
Today I want to enable automatic deployment to AWS when i push on my main branch.
I’m using GitHub Actions as the CI/CD platform today due to it’s fast speed, ease-of-use and it’s free.
That however leaves me with the problem of securely authenticating with AWS within the GitHub action environment.
Previously, you’ve had to use IAM credentials to authenticate within GitHub Actions, however as of 2021, GitHub provided support for OIDC which enables a simple and secure mechanism for authenticating your GitHub runner session.
We’re going to:
- Add GitHub as Identity Provider in AWS
- Create AWS IAM Role with trust relationship to Identity Provider and your GitHub Repo.
- Create GitHub Action
- Testing
- Perfecting (CloudFront Cache Invalidation)
- Done!
What is AWS OIDC
AWS OIDC (OpenID Connect) is an authentication mechanism that allows you to use your existing identity provider to authenticate users and applications to AWS resources. OIDC is based on the OAuth 2.0 framework and provides a standard way to exchange identity information between different systems.
AWS OIDC provides a simple and secure way to authenticate GitHub Actions with AWS resources without exposing any sensitive information. In this post, we will explore how to use AWS OIDC for GitHub Actions authentication and enhance the security of your software workflows.
AWS Identity Provider
First you need to add GitHub as an OIDC identity provider to your AWS account.
Add Identity Provider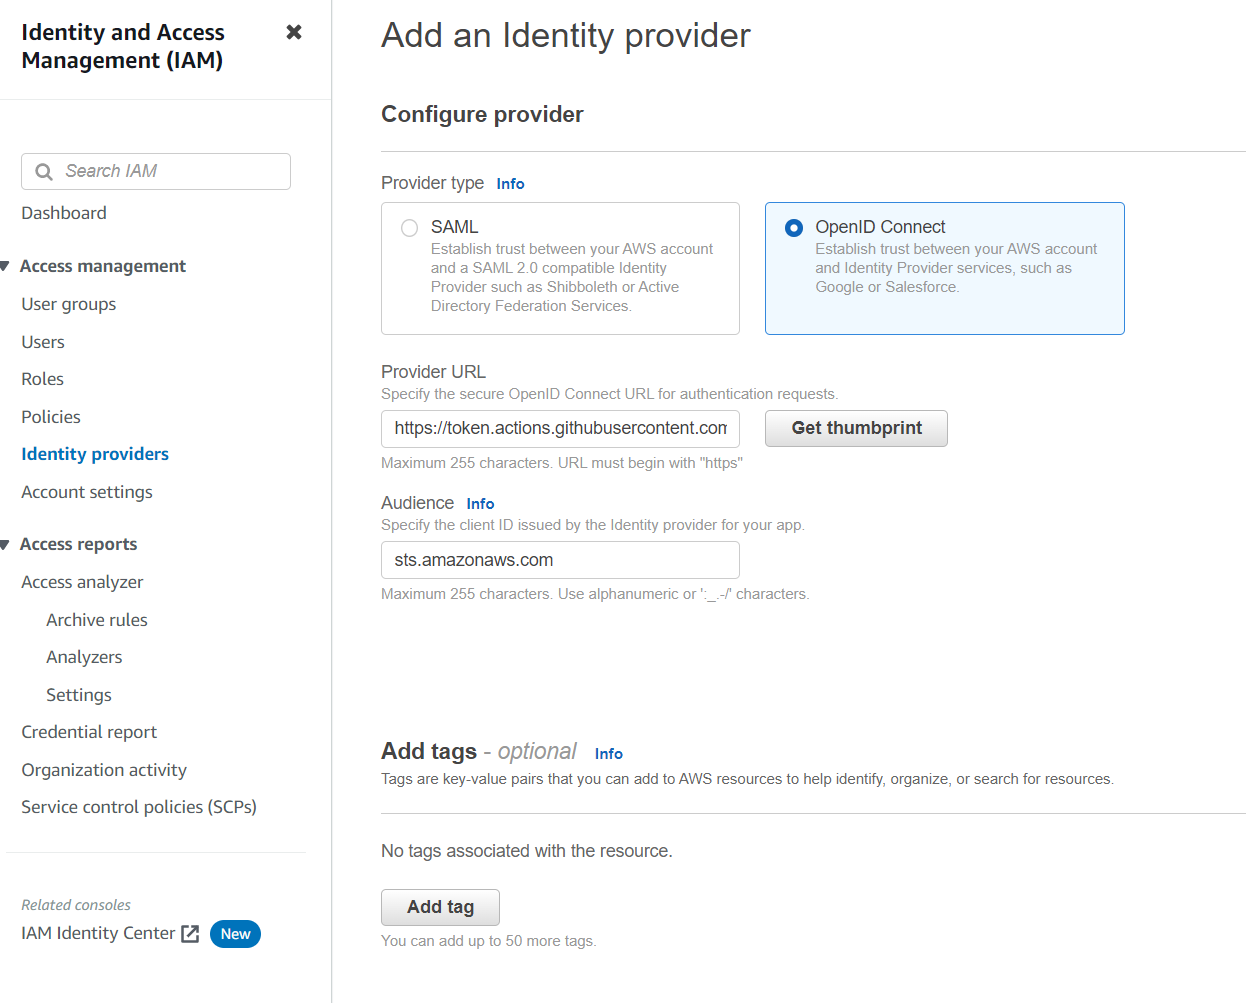
- Provider URL: https://token.actions.githubusercontent.com
- Audience: sts.amazonaws.com
Click get thumbprint and save.
AWS Role
Next you want to create a role with a trust relationship to the new identity provider.
Create Role
- It’s recommended to create a custom IAM Policy for the role, following principle of least privilege.
Once the Role has been created with the policy added, we need to edit the trust policy on the role and add our GitHub Repo. This will ensure the Role can only be assumed by GitHub Actions, and only by that specific repo.
Create Role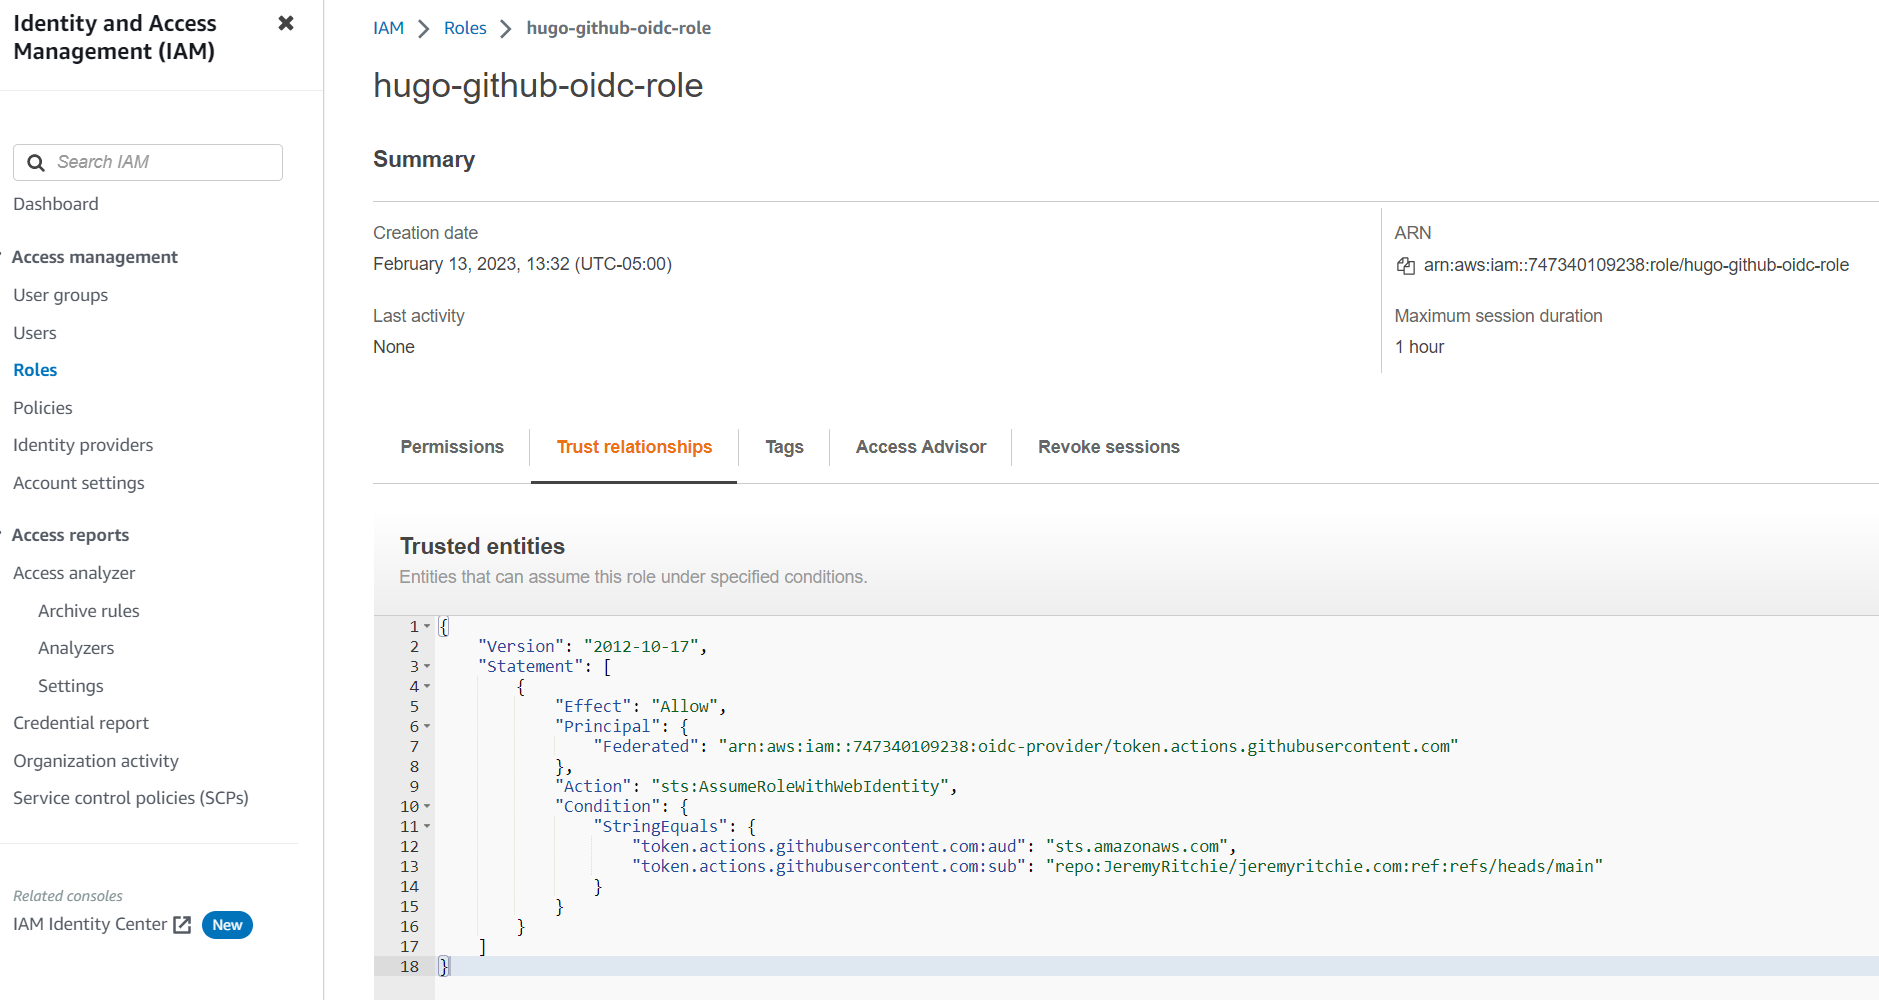
To secure your OIDC Role, you must overwrite the condition statement to be the following:
            "Condition": {
                "StringEquals": {
                    "token.actions.githubusercontent.com:aud": "sts.amazonaws.com",
                    "token.actions.githubusercontent.com:sub": "repo:<GitHub Org>/<GitHub Repo>:ref:refs/heads/<GitHub Branch>"
                }
            }
Simply replace <GitHub Org>, <GitHub Repo> and <GitHub Branch> with your respective names.
Here’s my full example:
{
    "Version": "2012-10-17",
    "Statement": [
        {
            "Effect": "Allow",
            "Principal": {
                "Federated": "arn:aws:iam::747340109238:oidc-provider/token.actions.githubusercontent.com"
            },
            "Action": "sts:AssumeRoleWithWebIdentity",
            "Condition": {
                "StringEquals": {
                    "token.actions.githubusercontent.com:aud": "sts.amazonaws.com",
                    "token.actions.githubusercontent.com:sub": "repo:JeremyRitchie/jeremyritchie.com:ref:refs/heads/main"
                }
            }
        }
    ]
}
GitHub Action
The Action is broken down into 4 Key Stages:
- Checkout Repo
- AWS Authenticate
- Install Hugo
- Run Hugo
name: Deploy Hugo site to AWS

# Run action on push to main branch
on:
  push:
    branches: ["main"]

permissions:
      id-token: write   # This is required for requesting the JWT
      contents: read    # This is required for actions/checkout

# Define environment variables for simplicity
env:
  AWS_REGION : ap-southeast-2
  AWS_ROLE_ARN : arn:aws:iam::747340109238:role/hugo-github-oidc-role
  HUGO_VERSION: 0.110.0

# Set bash as the default shell
defaults:
  run:
    shell: bash

jobs:
  build:
    runs-on: ubuntu-latest
    steps:
      # Step 1 - Checkout Repo
      - name: Checkout
        uses: actions/checkout@v3
        with:
          submodules: recursive
      # Step 2 - AWS Authenticate
      - name: configure aws credentials
        uses: aws-actions/configure-aws-credentials@v1
        with:
          role-to-assume: ${{ env.AWS_ROLE_ARN }}
          role-session-name: github-action
          aws-region: ${{ env.AWS_REGION }}
      # Step 3 - Install Hugo
      - name: Install Hugo CLI
        run: |
          wget -O ${{ runner.temp }}/hugo.deb https://github.com/gohugoio/hugo/releases/download/v${HUGO_VERSION}/hugo_extended_${HUGO_VERSION}_linux-amd64.deb \
          && sudo dpkg -i ${{ runner.temp }}/hugo.deb
      # Step 4 - Run Hugo
      - name: Build with Hugo
        env:
          # For maximum backward compatibility with Hugo modules
          HUGO_ENVIRONMENT: production
          HUGO_ENV: production
        run: |
          hugo --minify
      - name: Hugo Deploy
        run: |
          hugo deploy --force
My Hugo config.toml is configured with the S3 bucket so i don’t need to provide it as an environment variable.
Let’s create the workflow file at .github/workflows/hugo.yml and commit it to the main branch.
Create Workflow file
Let’s test it!
Testing
Creating the workflow is a commit, which is all we need to trigger the github action to run!
Deploying Hugo Static files to S3
Fantastic! We can see it all worked correctly. Now for every commit to the main branch, i will automatically update the website.
However i’m not seeing my new content right away?
That’s because of two main reasons:
- Cloudfront Distribution Cache
- Web browser Cache
We can solve the Web browser Cache with ctrl-shift-r (refresh page without cache).
And we can solve the Cloudfront Distribution cache problem by creating a distribution invalidation.
aws cloudfront create-invalidation --distribution-id <ID> --paths "/*"
Let’s quickly add that.
Cloudfront Distribution Invalidation Step
Add Distribution ID to Action env’s, and then add a final step to the job.
      - name: Create Invalidation
        run: |
          aws cloudfront create-invalidation --distribution-id ${{ env.AWS_DIST_ID }} --paths "/*"
Let’s retest:
Cloudfront Invalidation Step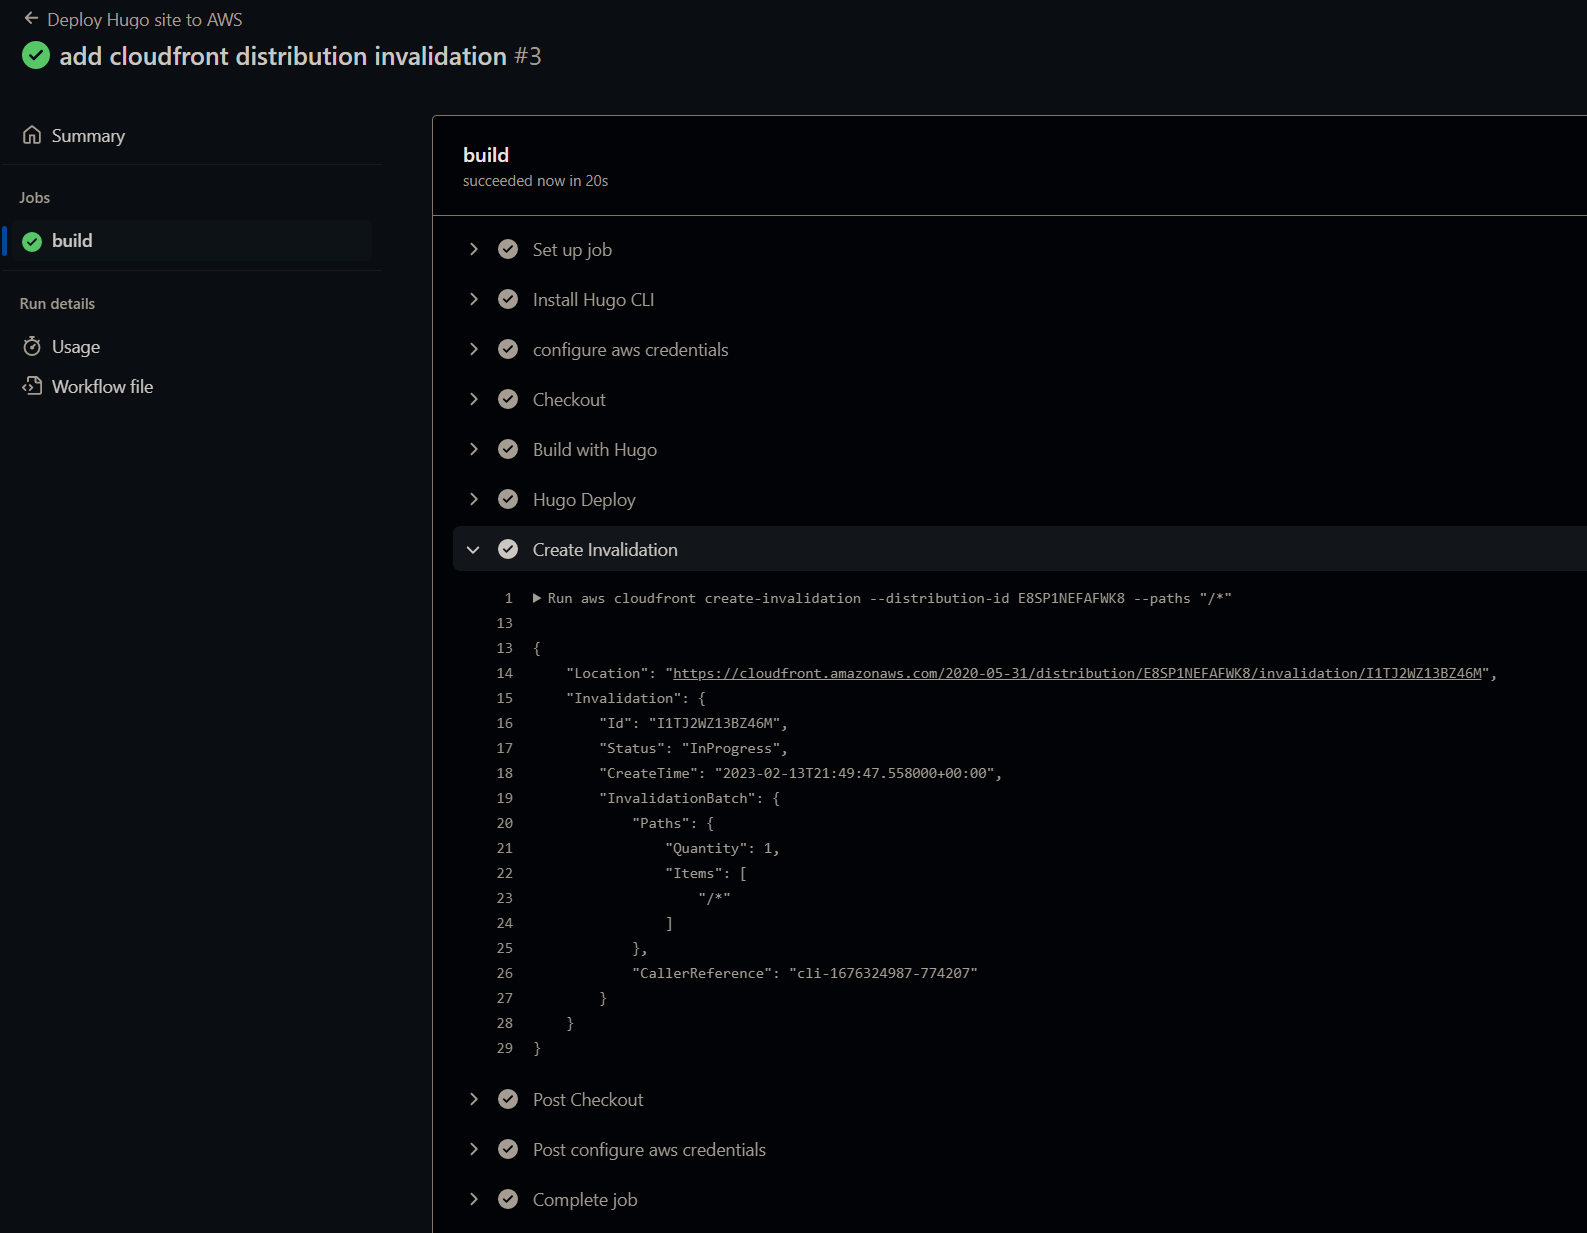
Done!
Conclusion
Finally! I have CI/CD on my own website.
It was simple to do and i hope it’s simple to follow. I highly recommend everyone adds automation to their own projects to ensure you’re following the practices you preach.