AWS TEAM (Temporary Elevated Access Management): The missing AWS service for Access Management
AWS has long been missing a solution to provide time-bound privileged access management. While they don’t offically have a service yet, they do provide a SaaS solution you can deploy to achieve the same functionality as you can get with GCP PAM (privileged access management).
AWS TEAM (Temporary Elevated Access Management) has been a game-changer for me and my customers. I’ve been using it for many months now and I can’t believe more people aren’t talking about it.
Let me walk you through why I think every AWS shop should be running this, how to actually implement it (it’s easier than you think), and share some real-world scenarios where it’s saved my skin.
Table of contents
- Table of contents
- Why Traditional Privileged Access is a Nightmare
- How TEAM Works
- TEAM Use Cases in Practice
- Deployment
- Advanced TEAM Configuration
- Lessons Learned From Real Deployments
- Conclusion
Why Traditional Privileged Access is a Nightmare
Look, we’ve all been there. You start with the best security intentions, but then reality hits. Your dev team needs admin access to debug that production issue. Your ops folks need elevated perms to deploy that critical patch. Third-party vendors need access for maintenance. Before you know it, your “least privilege” environment looks like Swiss cheese.
I’ve seen every hack job in the book:
The Shared Admin Account
- “Hey, what’s the password for the admin account again?” Yeah, this eliminates any hope of accountability and just spreads credentials everywhere.
The Persistent God Mode
- You give someone AdministratorAccess because they need it “sometimes.” Spoiler alert: they probably use it twice a month, but now they have it 24/7.
The Email-Driven Access Process
- “Can you give me admin access? I’ll send you an email when I’m done.” This works great until you’re trying to scale, or someone forgets to revoke access, or it’s 2 AM and nobody’s answering emails.
The Break-Glass Account
- These emergency accounts that bypass everything tend to become the go-to solution because, let’s face it, they’re easier than following the “proper” process.
All of these approaches make security folks cry and create operational headaches. That’s exactly why I fell in love with TEAM - it actually solves these problems instead of just moving them around.
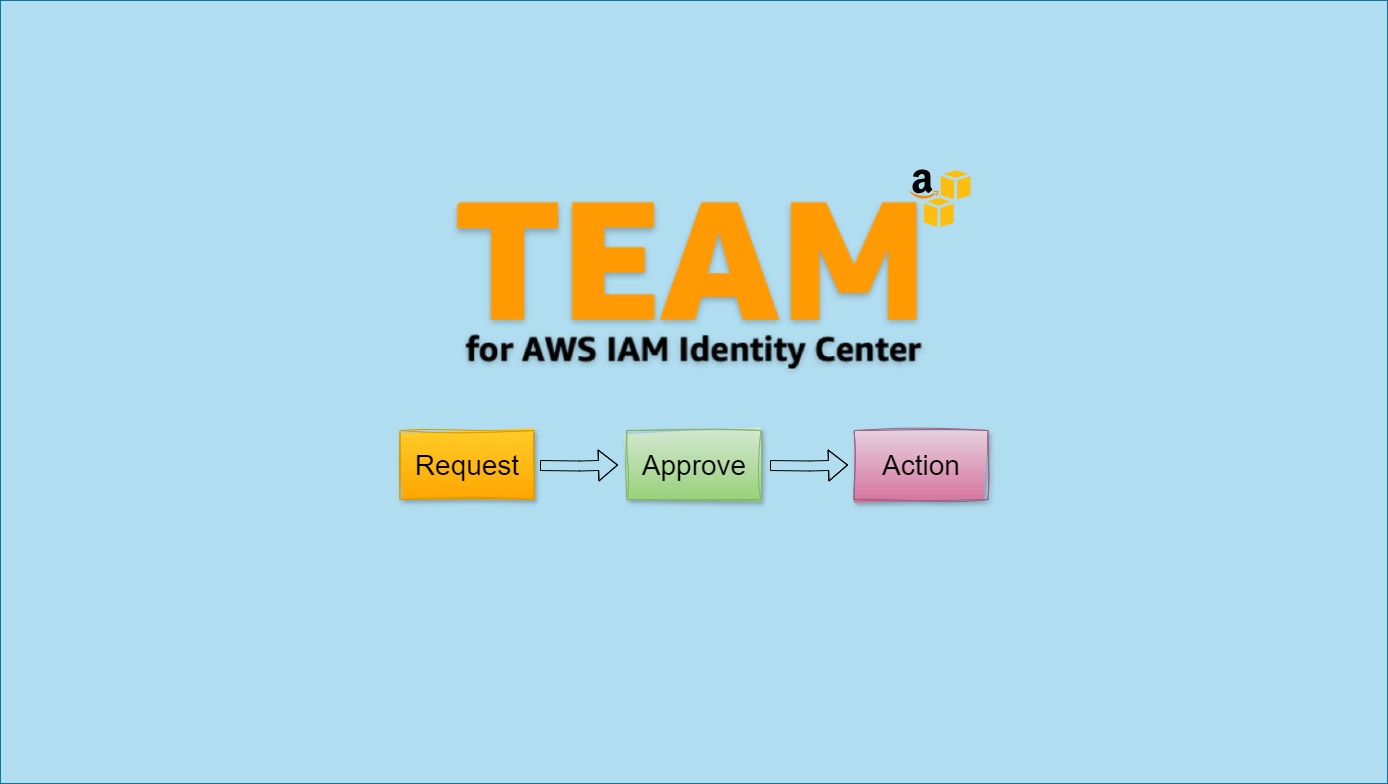
How TEAM Works
TEAM home page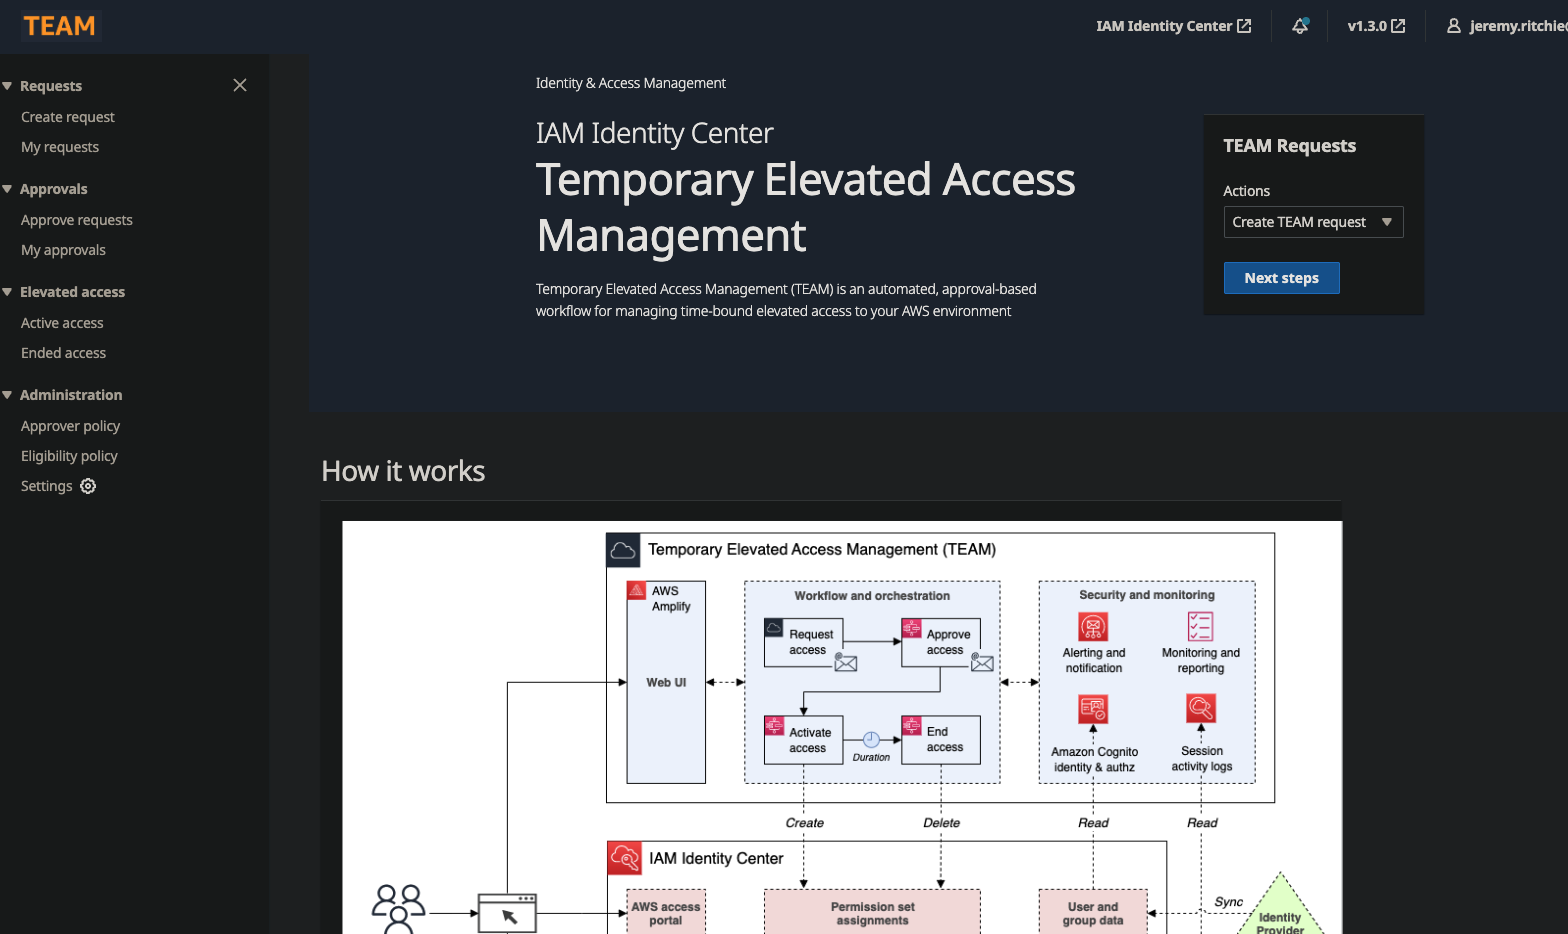
TEAM sits in the middle as your access broker. It’s the bouncer at a exclusive club, except this bouncer is automated, never gets tired, and keeps detailed notes about everyone who comes and goes.
The architecture is simple and uses services you’re likely already familiar with:
AWS IAM Identity Center is your identity foundation. If you’re already using this (and you should be), TEAM just plugs right in. No duplicate user management nonsense.
Amazon Cognito handles the login stuff and MFA. Users get a nice web portal instead of having to email someone or fill out a ticket.
AWS Amplify hosts the actual web app. It’s surprisingly polished - your users won’t hate using it, which is half the battle with security tools.
AWS Lambda does all the heavy lifting behind the scenes - processing requests, sending approvals, automatically revoking access when time’s up.
Amazon DynamoDB stores everything - who requested what, when it was approved, what they actually did. Your audit folks will love you.
Thanks to this architecture - it’s fully serverless. So it cost’s very little to own and operate!
Here’s why this setup actually works in the real world:
No More Standing Privileges
- Even if someone’s account gets compromised, the attacker can’t immediately wreak havoc because they still need to go through the approval process. It’s like having a second lock on your front door.
Everything’s Logged
- I can’t overstate how nice this is for compliance. Every click, every request, every approval is tracked. When your auditors come knocking, you’ve got everything they want in a neat package.
It Actually Saves Time
- Yeah, I know that sounds impossible for a security tool, but hear me out. No more manual provisioning, no more forgotten access cleanup, no more “can you remind me who has admin access again?” conversations.
Scales With Your Chaos
- Complex org structures? Multiple approval chains? Time-based access rules? TEAM handles all of it without breaking a sweat.
What can TEAM not do?
TEAM cannot be used to perform the following tasks:
- Grant temporary access to the management account
- Manage permission sets provisioned in the management account
Read the security considerations section for more information.
TEAM Use Cases in Practice
Emergency Access
TEAM handles emergency scenarios by implementing conditional approval workflows based on severity levels. For critical incidents, configure auto-approval for designated responder groups with short time limits (typically 2 hours). Non-critical requests still require standard manager approval.
Configuration approach:
- Create emergency roles with broad permissions but automatic time constraints
- Set up severity-based approval rules in TEAM workflows
- Configure on-call team groups with emergency access privileges
- Implement automated notifications to security teams for emergency activations
This eliminates the tension between rapid incident response and security controls while maintaining full audit trails.
Vendor Management
External vendor access becomes manageable through time-bounded, role-specific permissions. Instead of creating permanent accounts with manual cleanup processes, TEAM provides self-expiring access with comprehensive logging.
Implementation pattern:
- Create vendor-specific permission sets with limited scope
- Set engagement-based time limits (e.g., 5 business days for security assessments)
- Automatic access revocation when time expires
- Complete audit trail of all vendor activities for compliance reporting
No manual cleanup required, and detailed activity logs provide transparency into vendor actions.
Developer Self-Service
TEAM enables developer productivity without bypassing security controls through streamlined, time-limited production access. Development teams can request specific access levels for debugging and troubleshooting with appropriate approval workflows.
Typical configuration:
- 4-hour production access windows with team lead approval
- Integration with project management tools for context-aware approvals
- Role-based access tied to specific project assignments
- Automatic revocation prevents access creep
This eliminates central IT bottlenecks while maintaining proper oversight and control.
Compliance Workflows
Regulatory environments benefit from TEAM’s comprehensive logging and automated access management. Compliance-specific roles can be configured with appropriate approval chains and automatic documentation.
Key features for compliance:
- Maintenance window auto-approval for authorized personnel
- Complete audit trails meeting regulatory requirements
- Role-based access for compliance officers and auditors
- Automatic access documentation and reporting
Every action is logged with sufficient detail for audit purposes, simplifying compliance reporting and reducing manual documentation overhead.
Deployment
Prerequisites
1. AWS TEAM repository
- Fork the aws-samples/iam-identity-center-team repo
- Clone it locally
git clone https://github.com/YOUR-USERNAME-OR-ORG/REPO-NAME.git
cd REPO-NAME
2. GitHub Access Token
We need an Access Token (classic) to authenticate and get the code in Amplify from GitHub.
PAT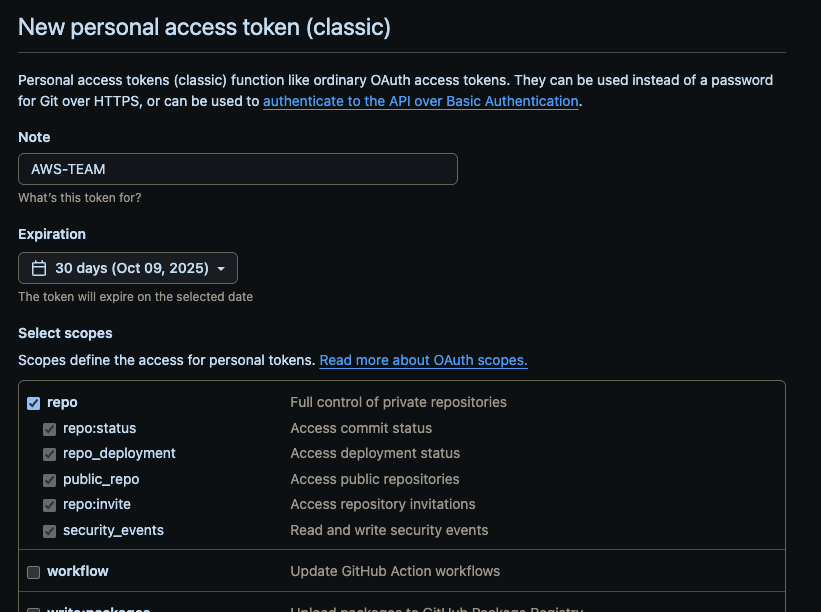
After creation, keep the access token in a safe place. You will need it later.
3. AWS Organizations
AWS Organizations managed multi account environment with AWS IAM Identity Center federated account access
- If you have deployed Control Tower, no further action is required.
4. Dedicated TEAM AWS Account
This account will also be configured as a delegated administrator for:
- IAM Identity Center
- CloudTrail Lake
- Account Management
It is not necessary to manually delegate those services to the TEAM account. A script will handle the delegation process later in this guide.
5. CloudTrail Lake organization event datastore
TEAM uses AWS CloudTrail Lake for querying, auditing, and logging API activities and actions performed by a user during elevated access. Create a Cloudtrail Lake organization event datastore in the dedicated TEAM account that stores all log events for all AWS accounts in your organization.
You need to complete this step manually on the Organization Management Account.
Navigate to: CloudTrail → Lake → Event data stores → Create event data store.
After creating the event data store, copy their ARN and keep it in a safe place. You will need it later.
6. Secrets Manager
TEAM requires you to deploy the solution using an external GitHub repository. Create a secret in AWS Secret Manager containing your repository URL and Access Token (both of which you created before), as shown below.
{
		"url":"https://github.com/YOUR-USERNAME-OR-ORG/REPO-NAME.git",
		"AccessToken":"ACCESS_TOKEN"
}
Replace YOUR-USERNAME-OR-ORG, REPO-NAME, and ACCESS_TOKEN with your own information.
You need to complete this step manually on the TEAM Account.
Navigate to: Secrets Manager → Store a new secret.
After creating the secret, copy their name and keep it in a safe place. You will need it later.
7. TEAM groups
Set up groups within AWS IAM Identity Center for TEAM Admins and TEAM Auditors. These groups can be created locally within the Identity Center or synchronized from an external identity provider per your organization’s group membership review and attestation process.
Refer to the solution overview for more information on TEAM personas and groups.
8. Deployment environment setup
Setup a named profile for AWS CLI with sufficient permissions for the Organization Management Account.
Setup a named profile for AWS CLI with sufficient permissions for the TEAM Account.
The Actual Deployment
TEAM deploys through AWS Amplify, which automates the infrastructure provisioning and application hosting. The deployment process creates all necessary backend resources automatically.
1. Create deployment parameters file
Create a new file named parameters.sh in the deployment directory.
cd deployment
cp -n parameters-template.sh parameters.sh
Update the parameters in the parameters.sh file as follows:
Required:
- IDC_LOGIN_URL - AWS IAM Identity Center Login URL (Without the /# suffix)
- REGION - AWS region where the application will be deployed (This must be the same region AWS IAM Identity Center is deployed in)
- TEAM_ACCOUNT - ID of AWS Account into which TEAM application will be deployed
- ORG_MASTER_PROFILE - Named profile for Organization Master Account
- TEAM_ACCOUNT_PROFILE - Named profile for TEAM Account
- TEAM_ADMIN_GROUP - Name of IAM Identity Center group for TEAM administrators
- TEAM_AUDITOR_GROUP - Name of IAM Identity Center group for TEAM auditors
- CLOUDTRAIL_AUDIT_LOGS - ARN of organization CloudTrail Lake event datastore (You created before)
- SECRET_NAME - Name of the Secret stored in AWS Secret Manager (You created before)
Optional:
- TAGS - Tags that should be propagated to nested stacks and underlying resources
- UI_DOMAIN - Custom domain for Amplify hosted frontend application (Should only be included if you have setup a custom domain for the frontend application)
For example:
IDC_LOGIN_URL=https://d-12345678.awsapps.com/start
REGION=us-east-1
TEAM_ACCOUNT=123456789101
ORG_MASTER_PROFILE=OrganizationManagementAccount_AWSAdministratorAccess
TEAM_ACCOUNT_PROFILE=TEAMAccount_AWSAdministratorAccess
TEAM_ADMIN_GROUP="TEAM_Administrators"
TEAM_AUDITOR_GROUP="TEAM_Auditors"
TAGS="department=devsecops environment=prod"
CLOUDTRAIL_AUDIT_LOGS=arn:aws:cloudtrail:us-east-1:123456789101:eventdatastore/e646f20d-7959-4682-be84-6c5b8a37cf15
UI_DOMAIN=portal.example.com
SECRET_NAME=TEAM-IDC-APP
2. Run initialization script
The init.sh bash script in the deployment folder configures the following prerequisites required for deploying the TEAM application:
- Configures the TEAM_ACCOUNT as a delegated admin for Account Management
- Configures the TEAM_ACCOUNT as a delegated admin for CloudTrail Management
- Configures the TEAM_ACCOUNT as a delegated admin for AWS IAM Identity Center Management
Execute the following command in the deployment directory to deploy the script.
./init.sh
Ensure that the named profile for the Organization Management Account has sufficient permissions before executing the deploy.sh script.
3. Run deployment script
The deploy.sh bash script in the deployment folder performs the following actions within the TEAM_ACCOUNT:
- Deploys a CloudFormation template that creates an amplify hosted application and CI/CD pipeline for deploying the TEAM application.
Ensure that the named profile for the TEAM Account has sufficient permissions before executing the deploy.sh script.
Execute the following command in the deployment directory to deploy the script.
./deploy.sh
Once the deployment script has completed execution and the CloudFormation stack has been created successfully, go to the AWS Amplify console to monitor the status of the TEAM application deployment.
TEAM Amplify application TEAM Amplify deployment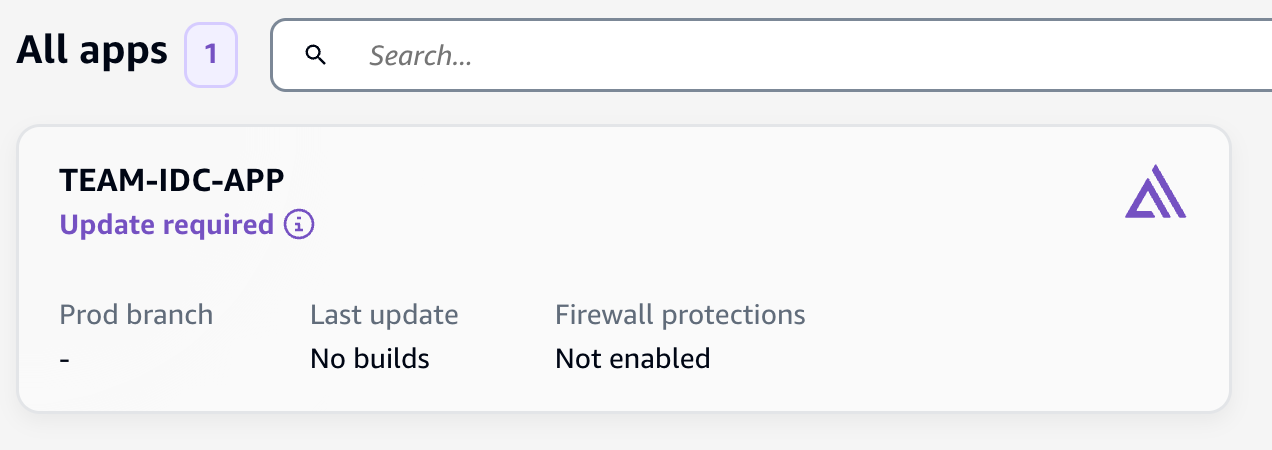
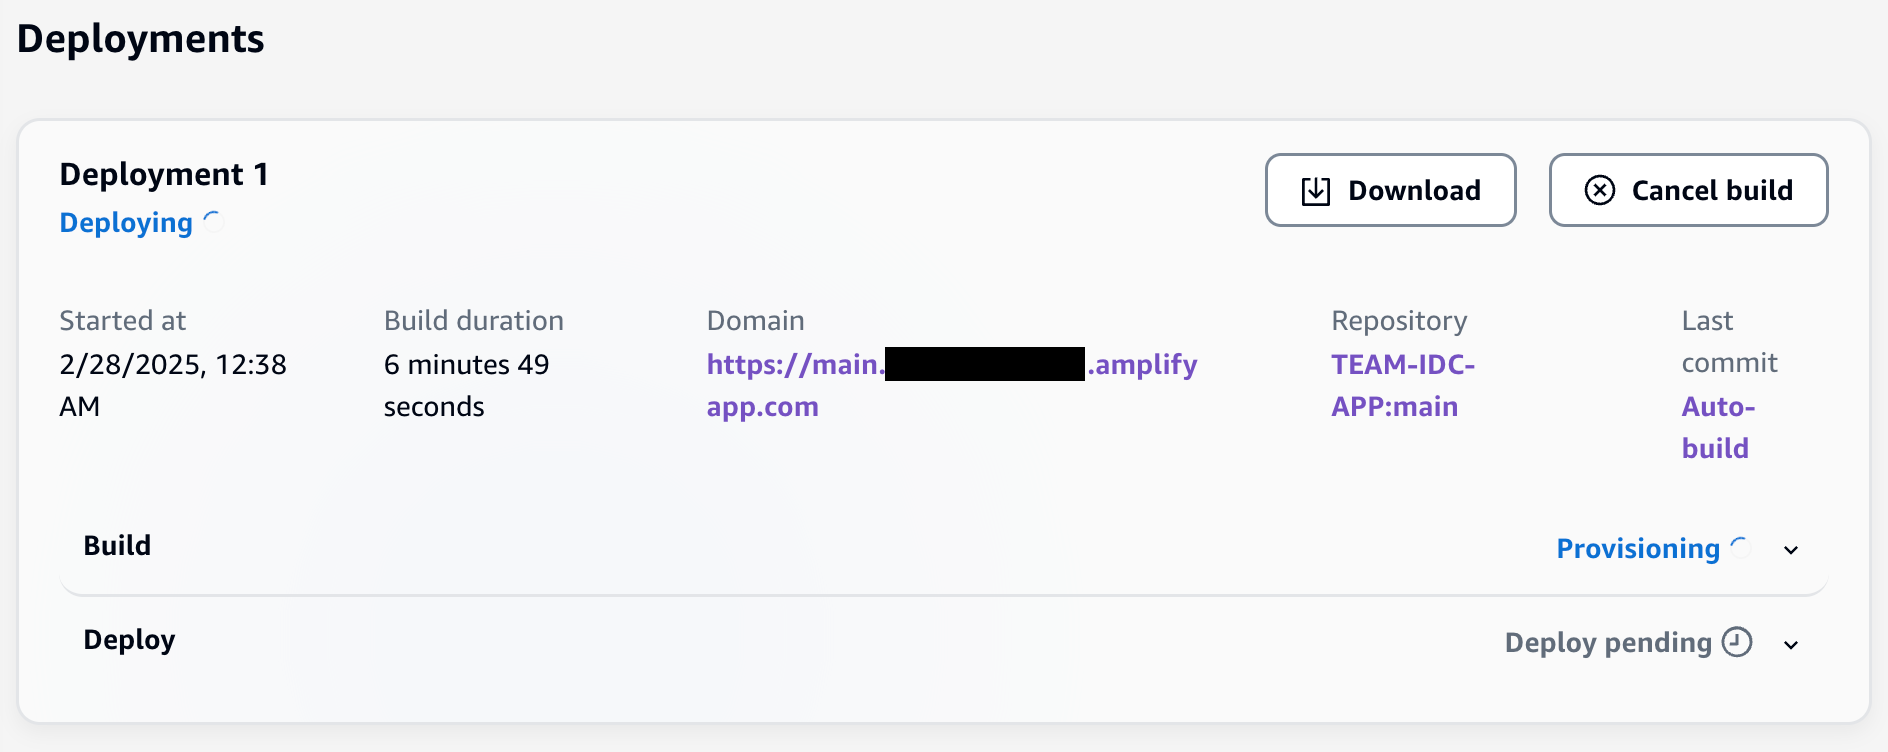
It takes about 20 minutes to complete the build and deployment of the Amplify application stack.
[Optional] Custom Domain Registration
This step is optional and required only if you have included a UI_DOMAIN parameter and intend to use a custom domain for your TEAM deployment instead of the default Amplify generated domain name.
Navigate to: AWS Amplify → All Apps → TEAM-IDC-APP → Domain Management → Add domain.
Custom domain
Follow instructions in Amplify Documentation.
Making It Talk to Identity Center
Okay, this is where it gets a bit more involved, but stick with me. We need to set up TEAM as a SAML application in Identity Center so users can actually log in.
1. Get Your SAML Configuration Parameters
First, run this script to get the parameters you’ll need:
./integration.sh
This spits out three important values:
- applicationStartURL - Where users land when they click the TEAM app
- applicationACSURL - SAML callback URL
- applicationSAMLAudience - The Cognito user pool identifier
Write these down - you’ll need them in a minute.
2. Configure TEAM as a SAML App in Identity Center
Now hop over to your Identity Center console (in your org master account) and:
Go to Application assignment → Applications → Add application
Select Add custom SAML 2.0 Application and click Next
Name it “TEAM IDC APP” or whatever makes sense to you
IMPORTANT: Copy and save the AWS IAM Identity Center SAML metadata file URL - you’ll need this later. It looks like:
https://portal.sso.{region}.amazonaws.com/saml/metadata/{id}Under Application properties, paste your applicationStartURL value
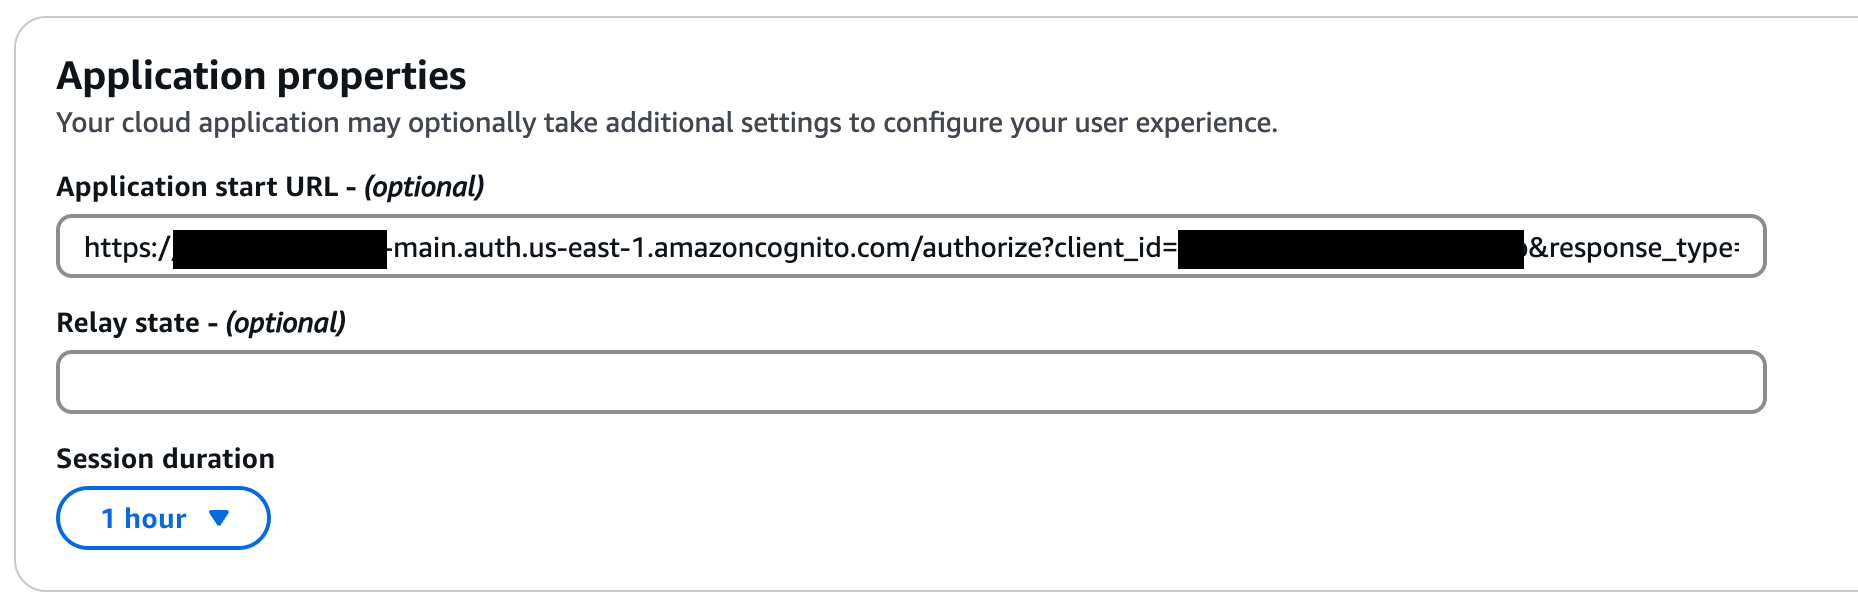
Application start URL
Under Application Metadata, choose “Manually type your metadata values”
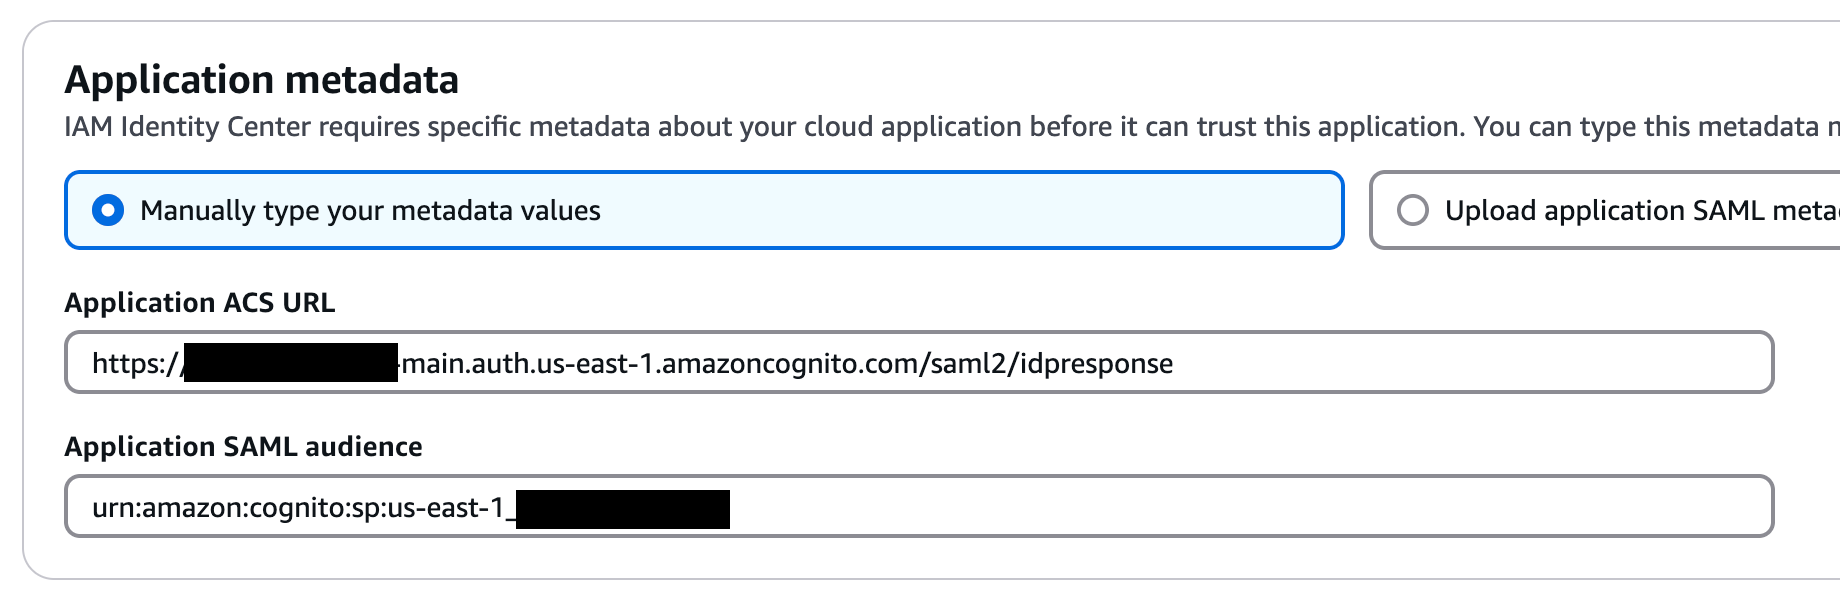
Application metadata
Paste your applicationACSURL and applicationSAMLAudience values in the respective fields
Click Submit to save it.
3. Set Up Attribute Mapping
Click Actions → Edit attribute mappings and add:
- Subject:
${user:subject}- persistent - Email:
${user:email}- basic
Attribute Mapping
4. Assign Users and Groups
Under Assigned Users, click Assign users and add your TEAM admin and auditor groups, plus any other users who should have access to TEAM.
User mapping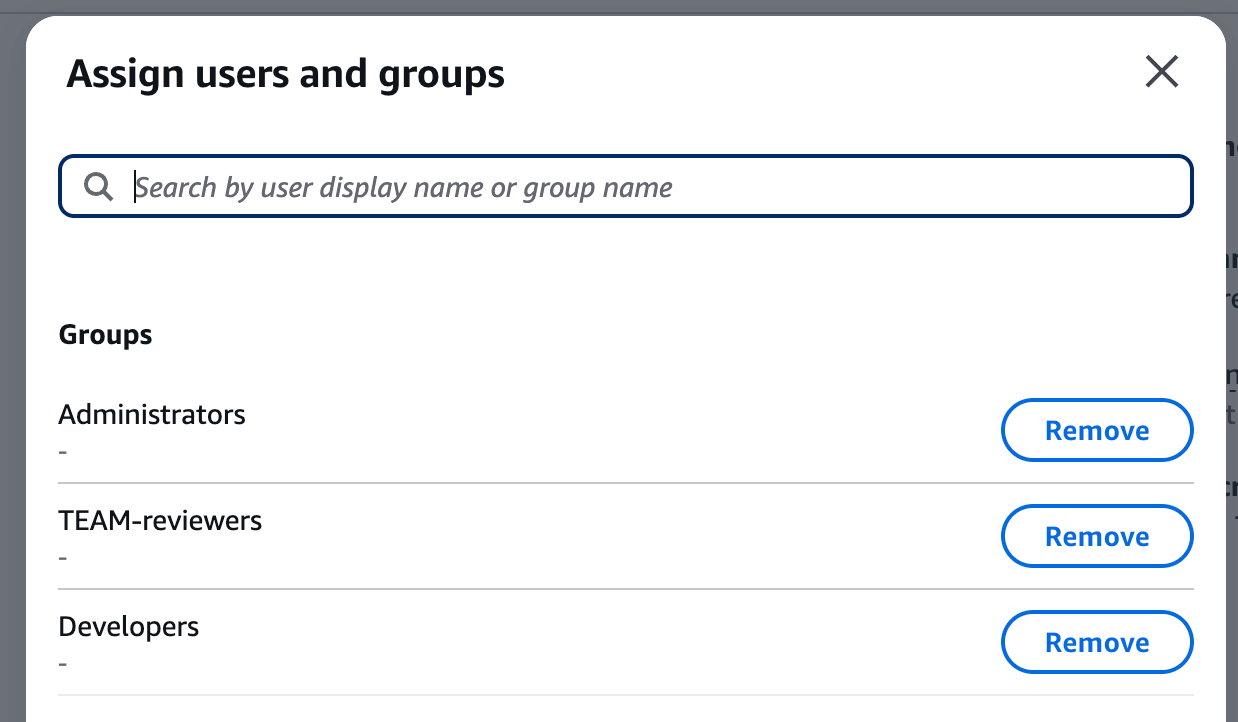
Don’t forget to assign your TEAM_Administrators and TEAM_Auditors groups here - these are what give people admin and auditor privileges within TEAM itself.
5. Configure Cognito to Talk to Identity Center
Almost there! Now we need to tell Cognito how to authenticate against Identity Center.
Create a details.json file in your deployment directory:
cp details-template.json details.json
Edit details.json and replace the MetadataURL with the SAML metadata URL you copied earlier:
{
    "MetadataURL": "https://portal.sso.us-east-1.amazonaws.com/saml/metadata/YOUR-ACTUAL-ID-HERE"
}
Then run the Cognito configuration script:
./cognito.sh
This configures Cognito to use Identity Center as a SAML provider and updates the TEAM application client to use it.
That’s It - You’re Done!
TEAM in SSO portal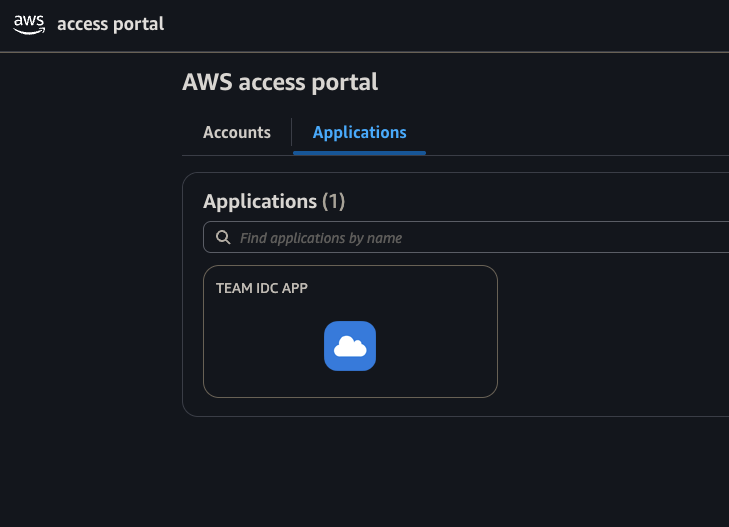
If everything went right, users should now be able to access TEAM through the Identity Center access portal. They’ll see a “TEAM IDC APP” tile they can click to access the application.
The deployment part is honestly the hardest bit. Once you’ve got TEAM running, the real fun begins - configuring it to work the way your organization actually operates.
Getting Your Policies Right
This is where you can either make your life easy or create a nightmare for yourself. Start simple - figure out the minimum permissions people actually need for common tasks, then build from there.
Time limits should make sense for what people are actually doing. Debugging a production issue? Maybe 4 hours. Running a compliance report? Probably 1 hour. Emergency response? Could be 8 hours, depending on how bad your incidents typically get.
Approval workflows should match how your organization actually works, not how you think it should work. If your team leads approve everything anyway, don’t force requests through the CTO first. Keep it simple and it’ll actually get used.
Eligibility policy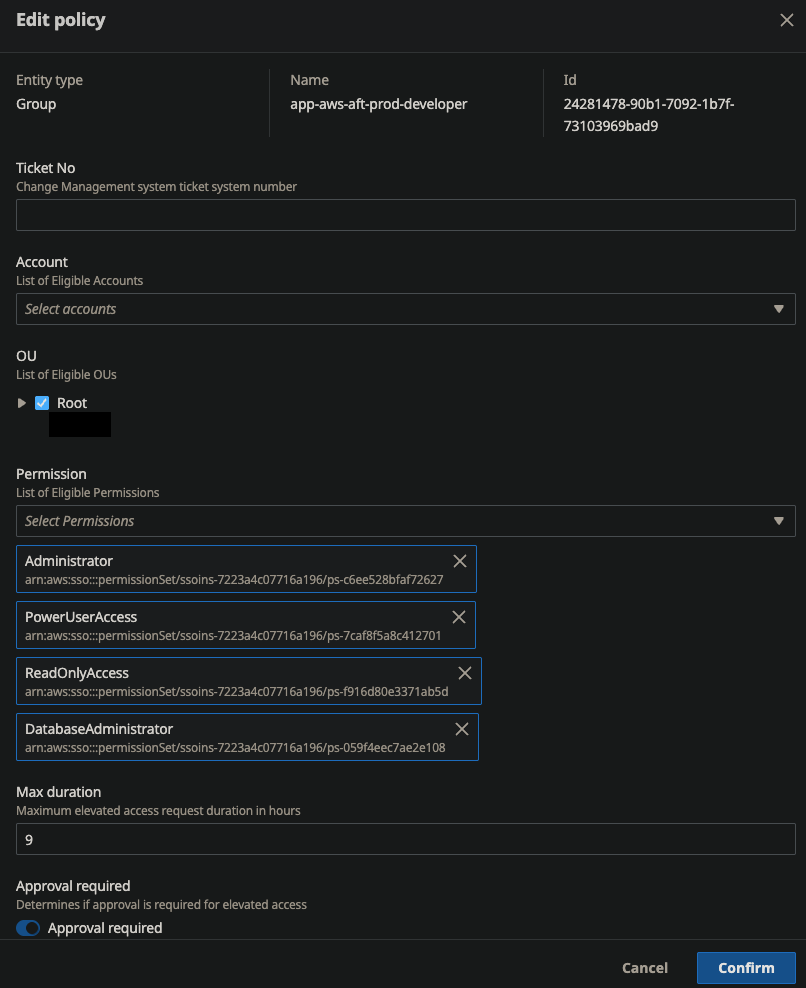
Approver policy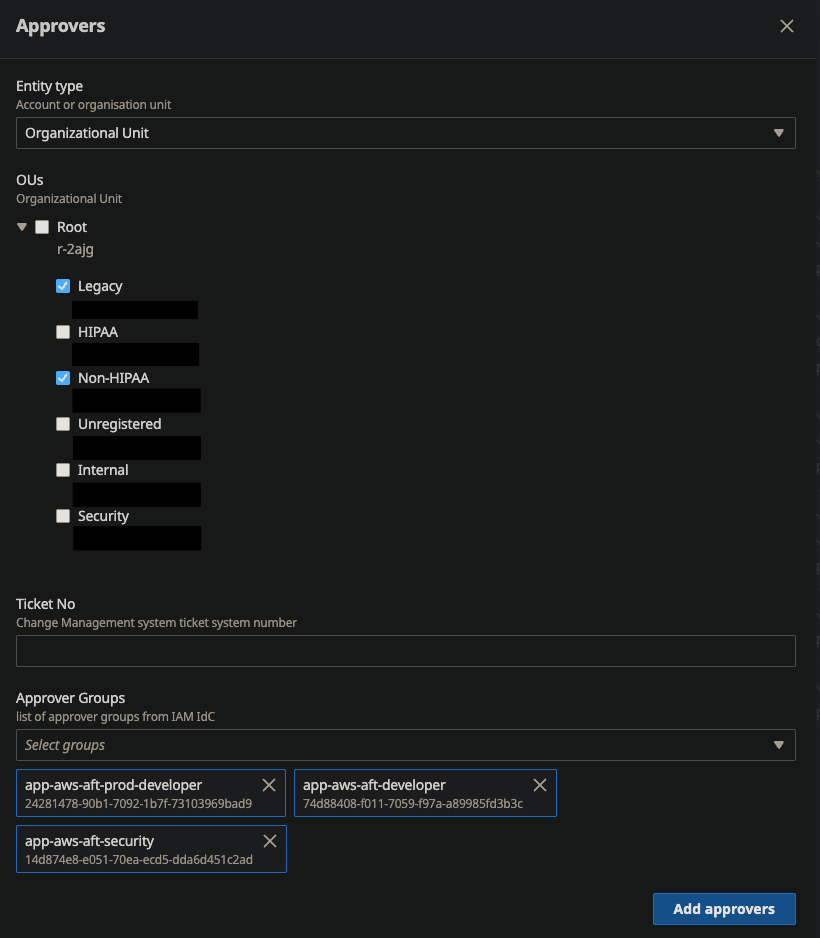
Advanced TEAM Configuration
API Integration
TEAM provides REST APIs for comprehensive integration with existing tooling.
Some possibilities include:
Change Management Integration:
- ServiceNow ticket creation automatically generates TEAM access requests
- Approval workflows integrate with existing change management processes
- Automatic access cleanup upon ticket closure
Monitoring System Integration:
- Alert-triggered access requests for incident response
- Automated access provisioning based on specific alert types
- Integration with on-call scheduling systems
Notification Configuration
TEAM supports multiple notification channels:
- Native email notifications
- SNS topic integration for custom notification workflows
- Slack integration for team collaboration
Team settings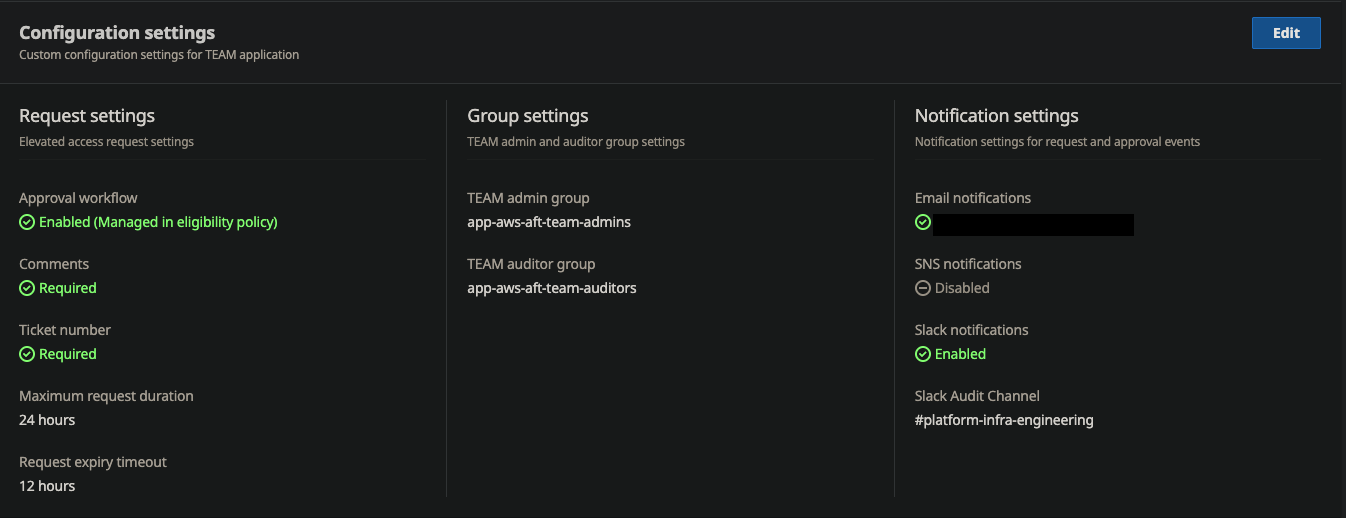
Lessons Learned From Real Deployments
Here’s what I wish someone had told me before my first TEAM deployment:
Start Small
- Don’t try to migrate your entire organization to TEAM on day one. Pick one team, one use case, get it working perfectly, then expand. I’ve seen too many ambitious rollouts crash and burn because they tried to boil the ocean.
Train Your Users
- Seriously, spend time explaining to people not just how to click the buttons, but why this new process is actually better than emailing their manager for admin access. Once they get it, they’ll become your biggest advocates.
Watch the Patterns
- After a few weeks, you’ll start seeing patterns in the access requests. Maybe everyone needs 6 hours instead of 4 for debugging. Maybe certain roles are requested constantly and should just have auto-approval. Pay attention and adjust accordingly.
Test Your Emergency Procedures
- Please, for the love of all that’s holy, test your emergency access procedures before you need them at 3 AM. Include this in your disaster recovery tests. The middle of an outage is not the time to discover your emergency access doesn’t work.
Document Who Approves What
- Write down who can approve which types of access and keep it updated. Nothing’s worse than having a critical request stuck because nobody knows who’s supposed to approve it.
Conclusion
AWS TEAM represents a fundamental shift in how organizations approach privileged access management. By eliminating the traditional trade-off between security and operational efficiency, TEAM enables true zero standing privileges without sacrificing productivity.
For organizations serious about zero trust architecture and least privilege principles, TEAM provides the missing piece that makes these security models actually practical to implement and maintain.
If you’re ready to move beyond shared admin accounts and email-driven access requests, TEAM offers a proven path forward that scales with your organization’s growth and complexity.