AWS SSM Port Tunneling: 7 Real-World Use Cases

This is an old but gold feature of SSM, but i’m continually surprised about how little good documentation there is only regarding it’s use cases. I hope this will help someone!
If you’re still running public bastion hosts or temporarily opening security groups to reach private resources, it’s time to stop. AWS Systems Manager (SSM) Session Manager supports audited, ephemeral port tunneling that works over the instance’s outbound connection to SSM.
- No inbound ports
- No public IPs
Below are practical, production‑ready use cases with exact commands and minimal setup.
Table of contents
- Table of contents
- How SSM port tunneling works
- Prerequisites
- Use case 1: SSH to a private EC2 instance (no bastion)
- Use case 2: Database access via SSM to a private RDS endpoint
- Use case 3: RDP to private Windows hosts
- Use case 4: Access private web UIs (Grafana, Kibana, OpenSearch, internal apps)
- Use case 5: VS Code Remote over SSM (browse and edit files)
- Use case 6: Dynamic SOCKS proxy for adhoc VPC browsing
- Use case 7: kubectl to a private EKS endpoint via SOCKS
- Operational tips: auditing, timeouts, and hardening
- Conclusion
How SSM port tunneling works
SSM establishes an outbound, TLS‑encrypted session from the managed instance to the SSM service. Because this is established outbound from the instance, that means no inbound Security Groups are required! That’s right, zero inbound rules necessary!
Port forwarding then binds a local port on your workstation and transports traffic over that session either to:
- a port on the instance itself, or
- any TCP endpoint reachable from the instance (remote host mode).
No inbound SG rules or public IPs are required. All access is IAM‑authorized and fully auditable.
Prerequisites
- Instance/host is a managed node in SSM: This means the SSM Agent is installed, key-pair attached,online, with the AmazonSSMManagedInstanceCore policy on its role. Online means that the Instance can talk to the AWS SSM Service. This is often simply through a NAT Gateway, but can also be via a VPC endpoint
- Your IAM principal has permissions to start and terminate sessions.
- AWS CLI v2 installed (includes the session‑manager‑plugin on macOS) and authenticated.
- For SSH examples, you have an OS user on the instance (e.g.,
ec2-user,ubuntu) and the instance’s SSH server is enabled (reachable locally from the instance itself).
Minimal IAM for users (attach via group or role):
{
  "Version": "2012-10-17",
  "Statement": [
    {"Effect": "Allow", "Action": [
      "ssm:StartSession", "ssm:TerminateSession", "ssm:DescribeSessions", "ssm:GetConnectionStatus"
    ], "Resource": "*"},
    {"Effect": "Allow", "Action": [
      "ssmmessages:CreateControlChannel", "ssmmessages:CreateDataChannel", "ssmmessages:OpenControlChannel", "ssmmessages:OpenDataChannel",
      "ec2messages:AcknowledgeMessage", "ec2messages:DeleteMessage", "ec2messages:FailMessage", "ec2messages:GetEndpoint", "ec2messages:GetMessages", "ec2messages:SendReply"
    ], "Resource": "*"}
  ]
}
Use case 1: SSH to a private EC2 instance (no bastion)
Best practice: use SSM as a ProxyCommand so SSH rides the SSM session.
Notes:
- No inbound 22 needed; SSH server only needs to listen on the instance’s loopback or private interface.
- All sessions are IAM‑authorized and visible in SSM Session history and CloudTrail.
Option 1: .ssh/config
You can write the config to your .ssh/config file for simple repeated access!
Add this to ~/.ssh/config:
Host i-*
    ProxyCommand sh -c "aws ssm start-session --target %h --document-name AWS-StartSSHSession --parameters 'portNumber=%p'"
    IdentityFile ~/.ssh/ec2_private_key.pem
    User ec2-user
Then:
ssh i-04025b02105b29a2a
Option 2: ssm session in terminal window
In one terminal window, start the session:
aws ssm start-session --target <INSERT INSTANCE ID HERE> \
                       --document-name AWS-StartPortForwardingSession \
                       --parameters '{"portNumber":["22"],"localPortNumber":["9999"]}'
You can then SSH into the instance:
ssh -i ~/.ssh/ec2_private_key.pem -p 9999 ec2-user@localhost
Use case 2: Database access via SSM to a private RDS endpoint
Option 1: port forward to RDS host
Forward localhost:5432 to a private Aurora/RDS database endpoint.
aws ssm start-session \
  --target <INSERT INSTANCE ID HERE> \
  --document-name AWS-StartPortForwardingSessionToRemoteHost \
  --parameters '{"host":["mydb.cluster-abcdefghijkl.us-east-1.rds.amazonaws.com"],"portNumber":["5432"],"localPortNumber":["5432"]}'
Connect with your local client:
psql "host=127.0.0.1 port=5432 dbname=postgres user=commure sslmode=require"
Rather than using psql, you can also connect via a DB Client:
PG Admin Connection
Tips:
- Works with MySQL (3306), SQL Server (1433), etc.
- Combine with RDS IAM auth by first fetching an auth token locally; the tunnel transports it transparently.
Option 2: Setup SSH Tunnel for DB client to use for forwarding to DB host
Setup Port forwarding session on EC2 Instance, Then a DB Client SSH Proxy setting to connect through to the database.
In one terminal window, start the session:
aws ssm start-session --target <INSERT INSTANCE ID HERE> \
                       --document-name AWS-StartPortForwardingSession \
                       --parameters '{"portNumber":["22"],"localPortNumber":["9999"]}'
You can then create your DB connection config in your DB Client of choice like in the image above.
Then configure the SSH Tunnel settings like so:
PG Admin SSH Tunnel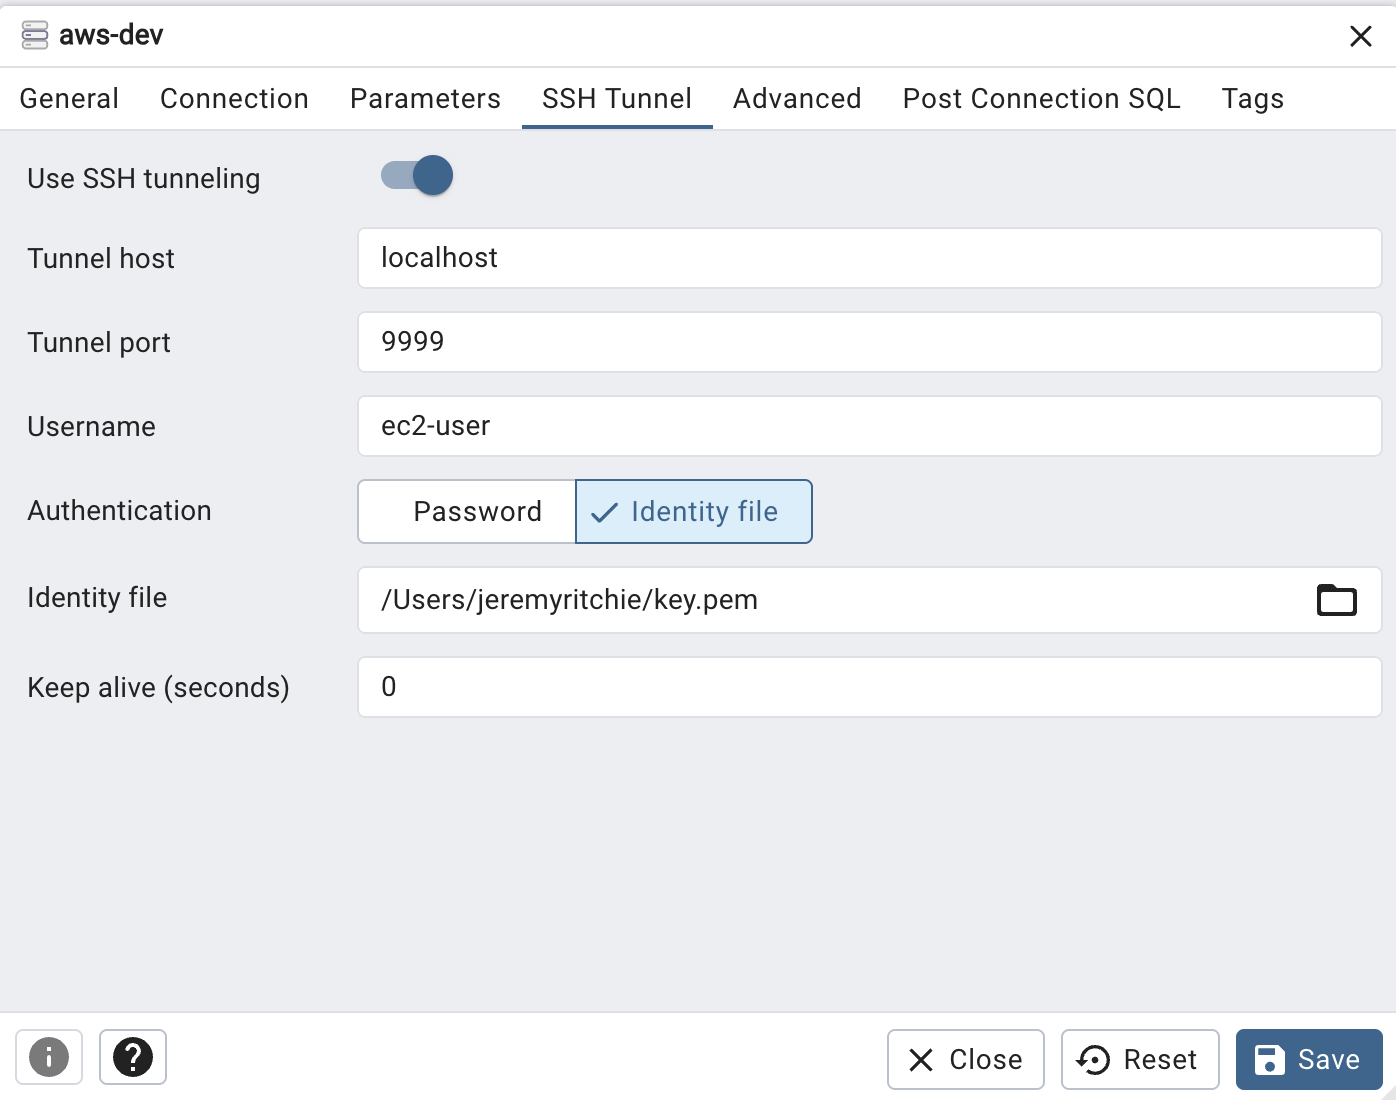
Use case 3: RDP to private Windows hosts
Tunnel RDP and connect your standard client.
No public RDP, no bastion.
aws ssm start-session \
  --target <INSERT INSTANCE ID HERE> \
  --document-name AWS-StartPortForwardingSession \
  --parameters '{"portNumber":["3389"],"localPortNumber":["13389"]}'
Open Microsoft Remote Desktop to 127.0.0.1:13389 via RDP client:
RDP Client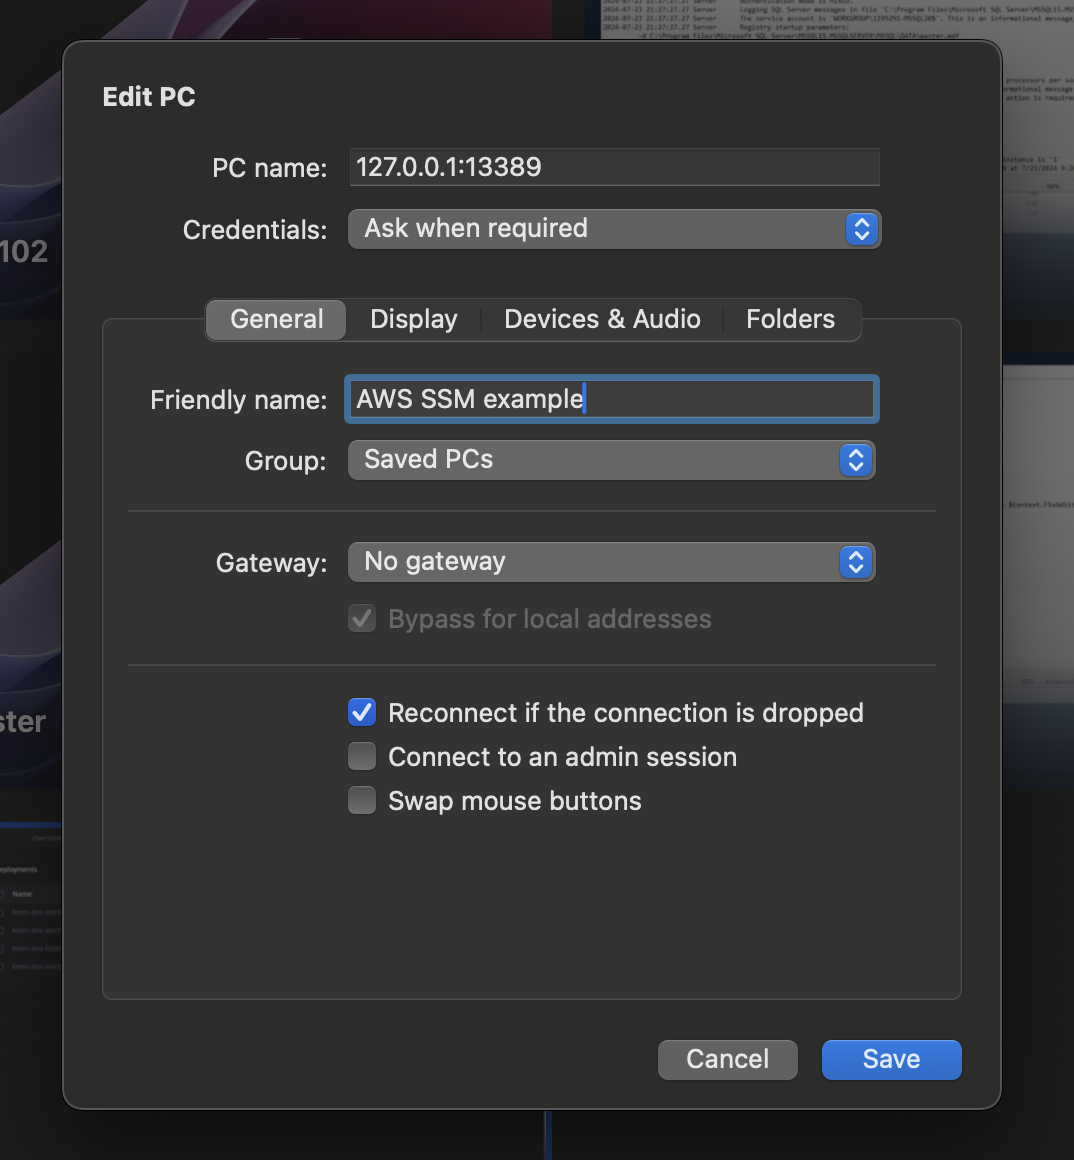
Use case 4: Access private web UIs (Grafana, Kibana, OpenSearch, internal apps)
Forward HTTPS to a VPC‑only service (managed or self‑hosted). Example: Amazon OpenSearch Service domain restricted to the VPC.
aws ssm start-session \
  --target <INSERT INSTANCE ID HERE> \
  --document-name AWS-StartPortForwardingSessionToRemoteHost \
  --parameters '{"host":["vpc-logs-abc123.us-east-1.es.amazonaws.com"],"portNumber":["443"],"localPortNumber":["8443"]}'
Then browse: https://localhost:8443.
Swap the host/port for Grafana (3000), Kibana (5601), internal admin UIs, etc.
Use case 5: VS Code Remote over SSM (browse and edit files)
Use VS Code’s Remote - SSH extension with SSM as the transport to get a full remote workspace—file browsing, editing, terminals, and port forwarding—without opening inbound ports.
Install the VS Code extension: “Remote - SSH” (ms-vscode-remote.remote-ssh).
Ensure your SSH config uses SSM as a ProxyCommand (see Use case 1). Add a friendly alias for VS Code:
Host vscode-ec2
  HostName <INSERT INSTANCE ID HERE>
  User ec2-user
  IdentityFile ~/.ssh/ec2_private_key.pem
  ProxyCommand sh -c "aws ssm start-session --target %h --document-name AWS-StartSSHSession --parameters 'portNumber=%p'"
- In VS Code: Command Palette (Ctrl/⌘ → Shift → P) → Type “Remote-SSH: Connect to Host” → select
vscode-ec2→ choose the remote OS. VS Code will install the server on the instance over the SSM-backed SSH session.
Command Palette - Connect to Host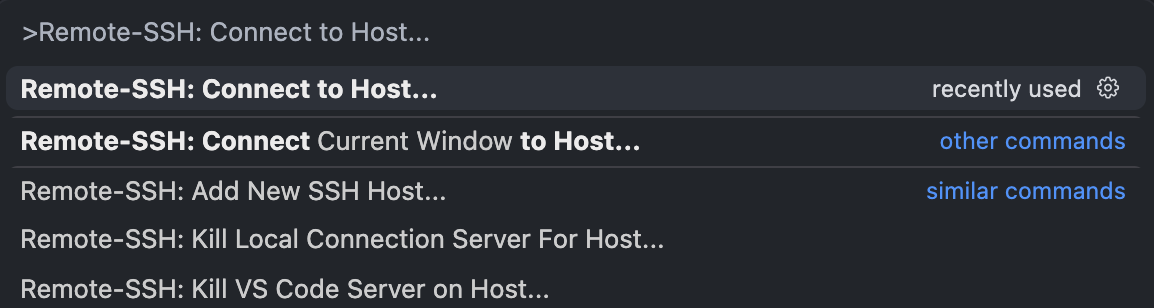
OR
You can locate your hosts on the left panel like so:
Command Palette - Connect to Host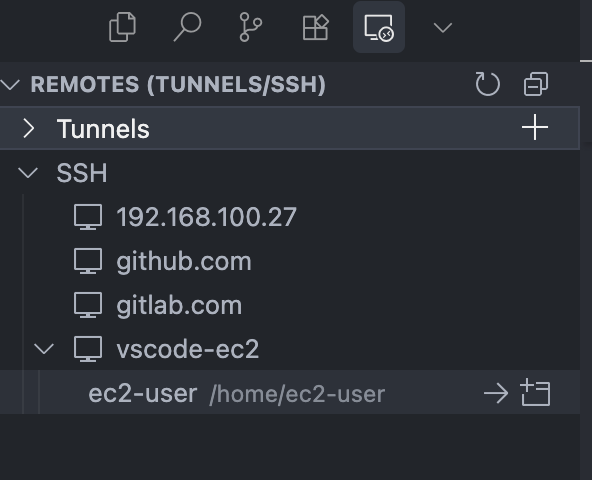
- Open a folder, use the integrated terminal, and manage port forwards from the Ports view (for previewing remote web apps securely via
localhost:<port>).
VSCode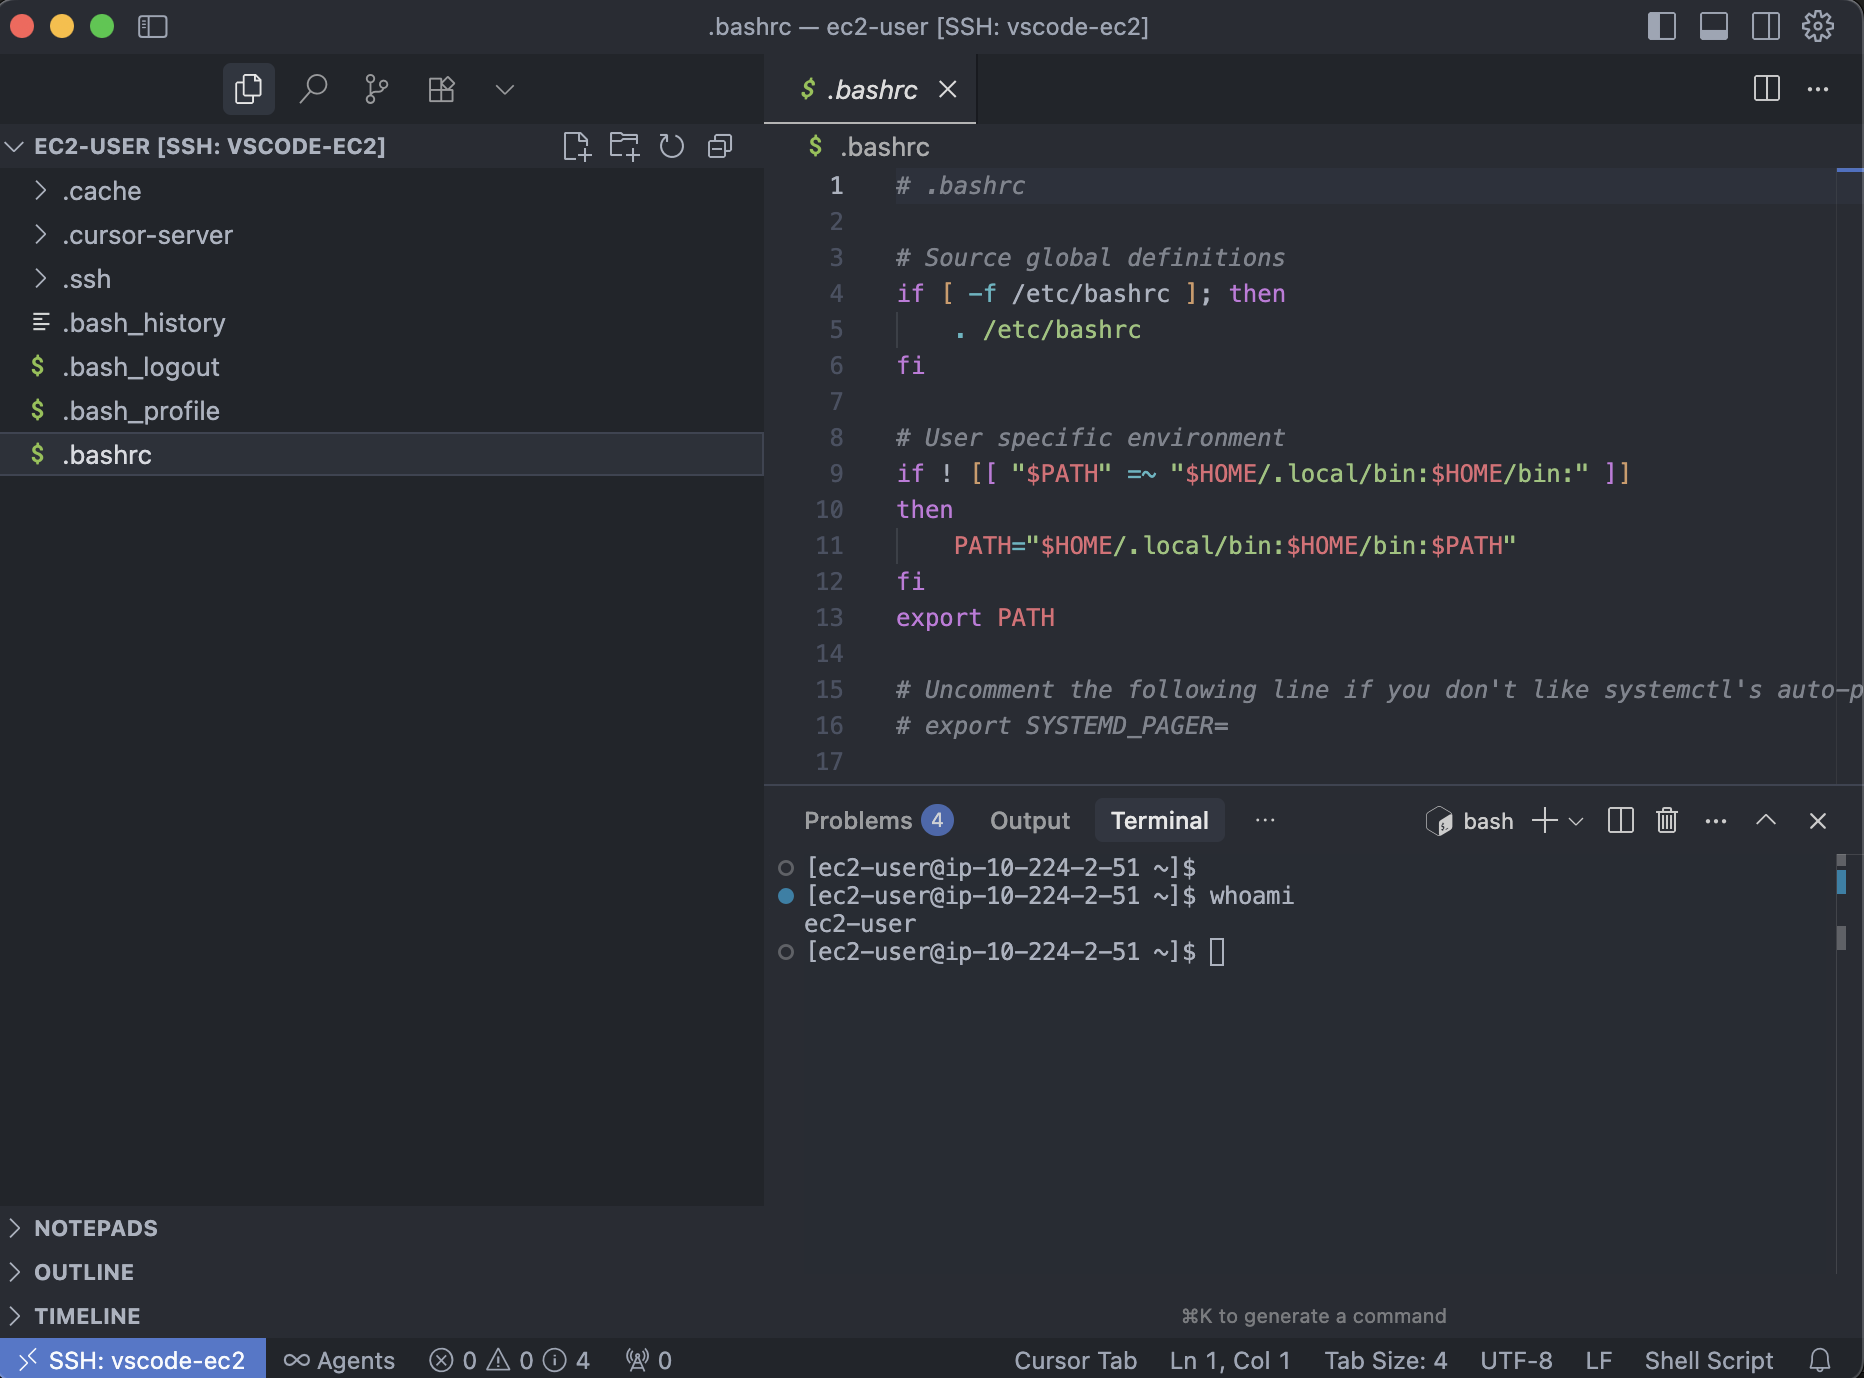
Notes:
- The instance only needs outbound internet to SSM and local SSH enabled; no public IP or inbound rules required.
- All access is IAM-governed and auditable via Session Manager and CloudTrail.
Use case 6: Dynamic SOCKS proxy for adhoc VPC browsing
A dynamic SOCKS proxy lets your apps connect to any host:port on demand through a single local proxy. Instead of forwarding one fixed destination (-L), SOCKS (-D) can reach many internal services without creating new tunnels each time.
- Why this over
-L?- Flexible: one tunnel, many targets (chosen by the client per request)
- Frictionless: great for browsers, curl, Postman, SDKs, CLIs
- Still zero inbound: traffic rides the SSM session; no bastion, no opened SGs
~/.ssh/config:
Host ssm-proxy
  HostName <INSERT INSTANCE ID HERE>
  User ec2-user
  IdentityFile ~/.ssh/ec2_private_key.pem
  ProxyCommand sh -c "aws ssm start-session --target %h --document-name AWS-StartSSHSession --parameters 'portNumber=%p'"
Start the SOCKS proxy:
ssh -N -D 127.0.0.1:1080 ssm-proxy
# optional: background, keepalive, fail fast on bind
# ssh -f -N -D 127.0.0.1:1080 -o ExitOnForwardFailure=yes -o ServerAliveInterval=60 ssm-proxy
Point your tools at the proxy:
- Browser: set SOCKS5 proxy to
127.0.0.1:1080(enable “proxy DNS” / “SOCKS remote DNS”). - curl:
curl --socks5-hostname 127.0.0.1:1080 https://internal.service.example
- Env vars (for CLIs/SDKs that honor proxies):
export ALL_PROXY=socks5h://127.0.0.1:1080
export NO_PROXY=localhost,127.0.0.1
Notes:
socks5h/--socks5-hostnameresolve DNS via the proxy (prevents local DNS leaks).- Keep the bind on loopback (
127.0.0.1) so it isn’t exposed to your LAN. - Only TCP is supported (SOCKS5-over-SSH/SSM does not carry UDP).
- The chosen EC2 instance must be able to reach your target subnets/endpoints (routes/NACL/SG).
- If you prefer VS Code Remote, see Use case 5; SSH here rides SSM the same way as in Use case 1.
Benefits:
- Flexibility: explore multiple private hosts/ports from one session
- Security: no public IPs or inbound SG rules; IAM-governed and auditable
- Speed: avoid juggling many
-Lforwards for web UIs that fetch assets from multiple hosts
Use case 7: kubectl to a private EKS endpoint via SOCKS
Building on the SOCKS proxy from use case 6, let’s connect to a private EKS cluster using it!
Run kubectl from your laptop to a private‑only EKS API by sending traffic through the SOCKS proxy from Use case 6. No public endpoint, no bastion.
Prereqs:
- The chosen EC2 instance can reach the cluster’s private API endpoint (same VPC/subnets or routed via TGW/peering; security groups allow it).
- Your local AWS CLI can authenticate to the cluster (standard IAM,
aws eks get-token).
- Ensure kubeconfig exists for the cluster:
aws eks update-kubeconfig --name my-cluster --region us-east-1 --kubeconfig ~/.kube/eks-private
export KUBECONFIG=~/.kube/eks-private
- Start the SOCKS proxy (from Use case 6):
ssh -N -D 127.0.0.1:1080 ssm-proxy
# optional: background, keepalive
# ssh -f -N -D 127.0.0.1:1080 -o ExitOnForwardFailure=yes -o ServerAliveInterval=60 ssm-proxy
- Route kubectl through SOCKS and run commands:
export ALL_PROXY=socks5h://127.0.0.1:1080
export NO_PROXY=localhost,127.0.0.1
kubectl get ns
kubectl get nodes -o wide
You can also use local tools like Lens to view and make changes to your cluster!
Lens connected via SOCKS Proxy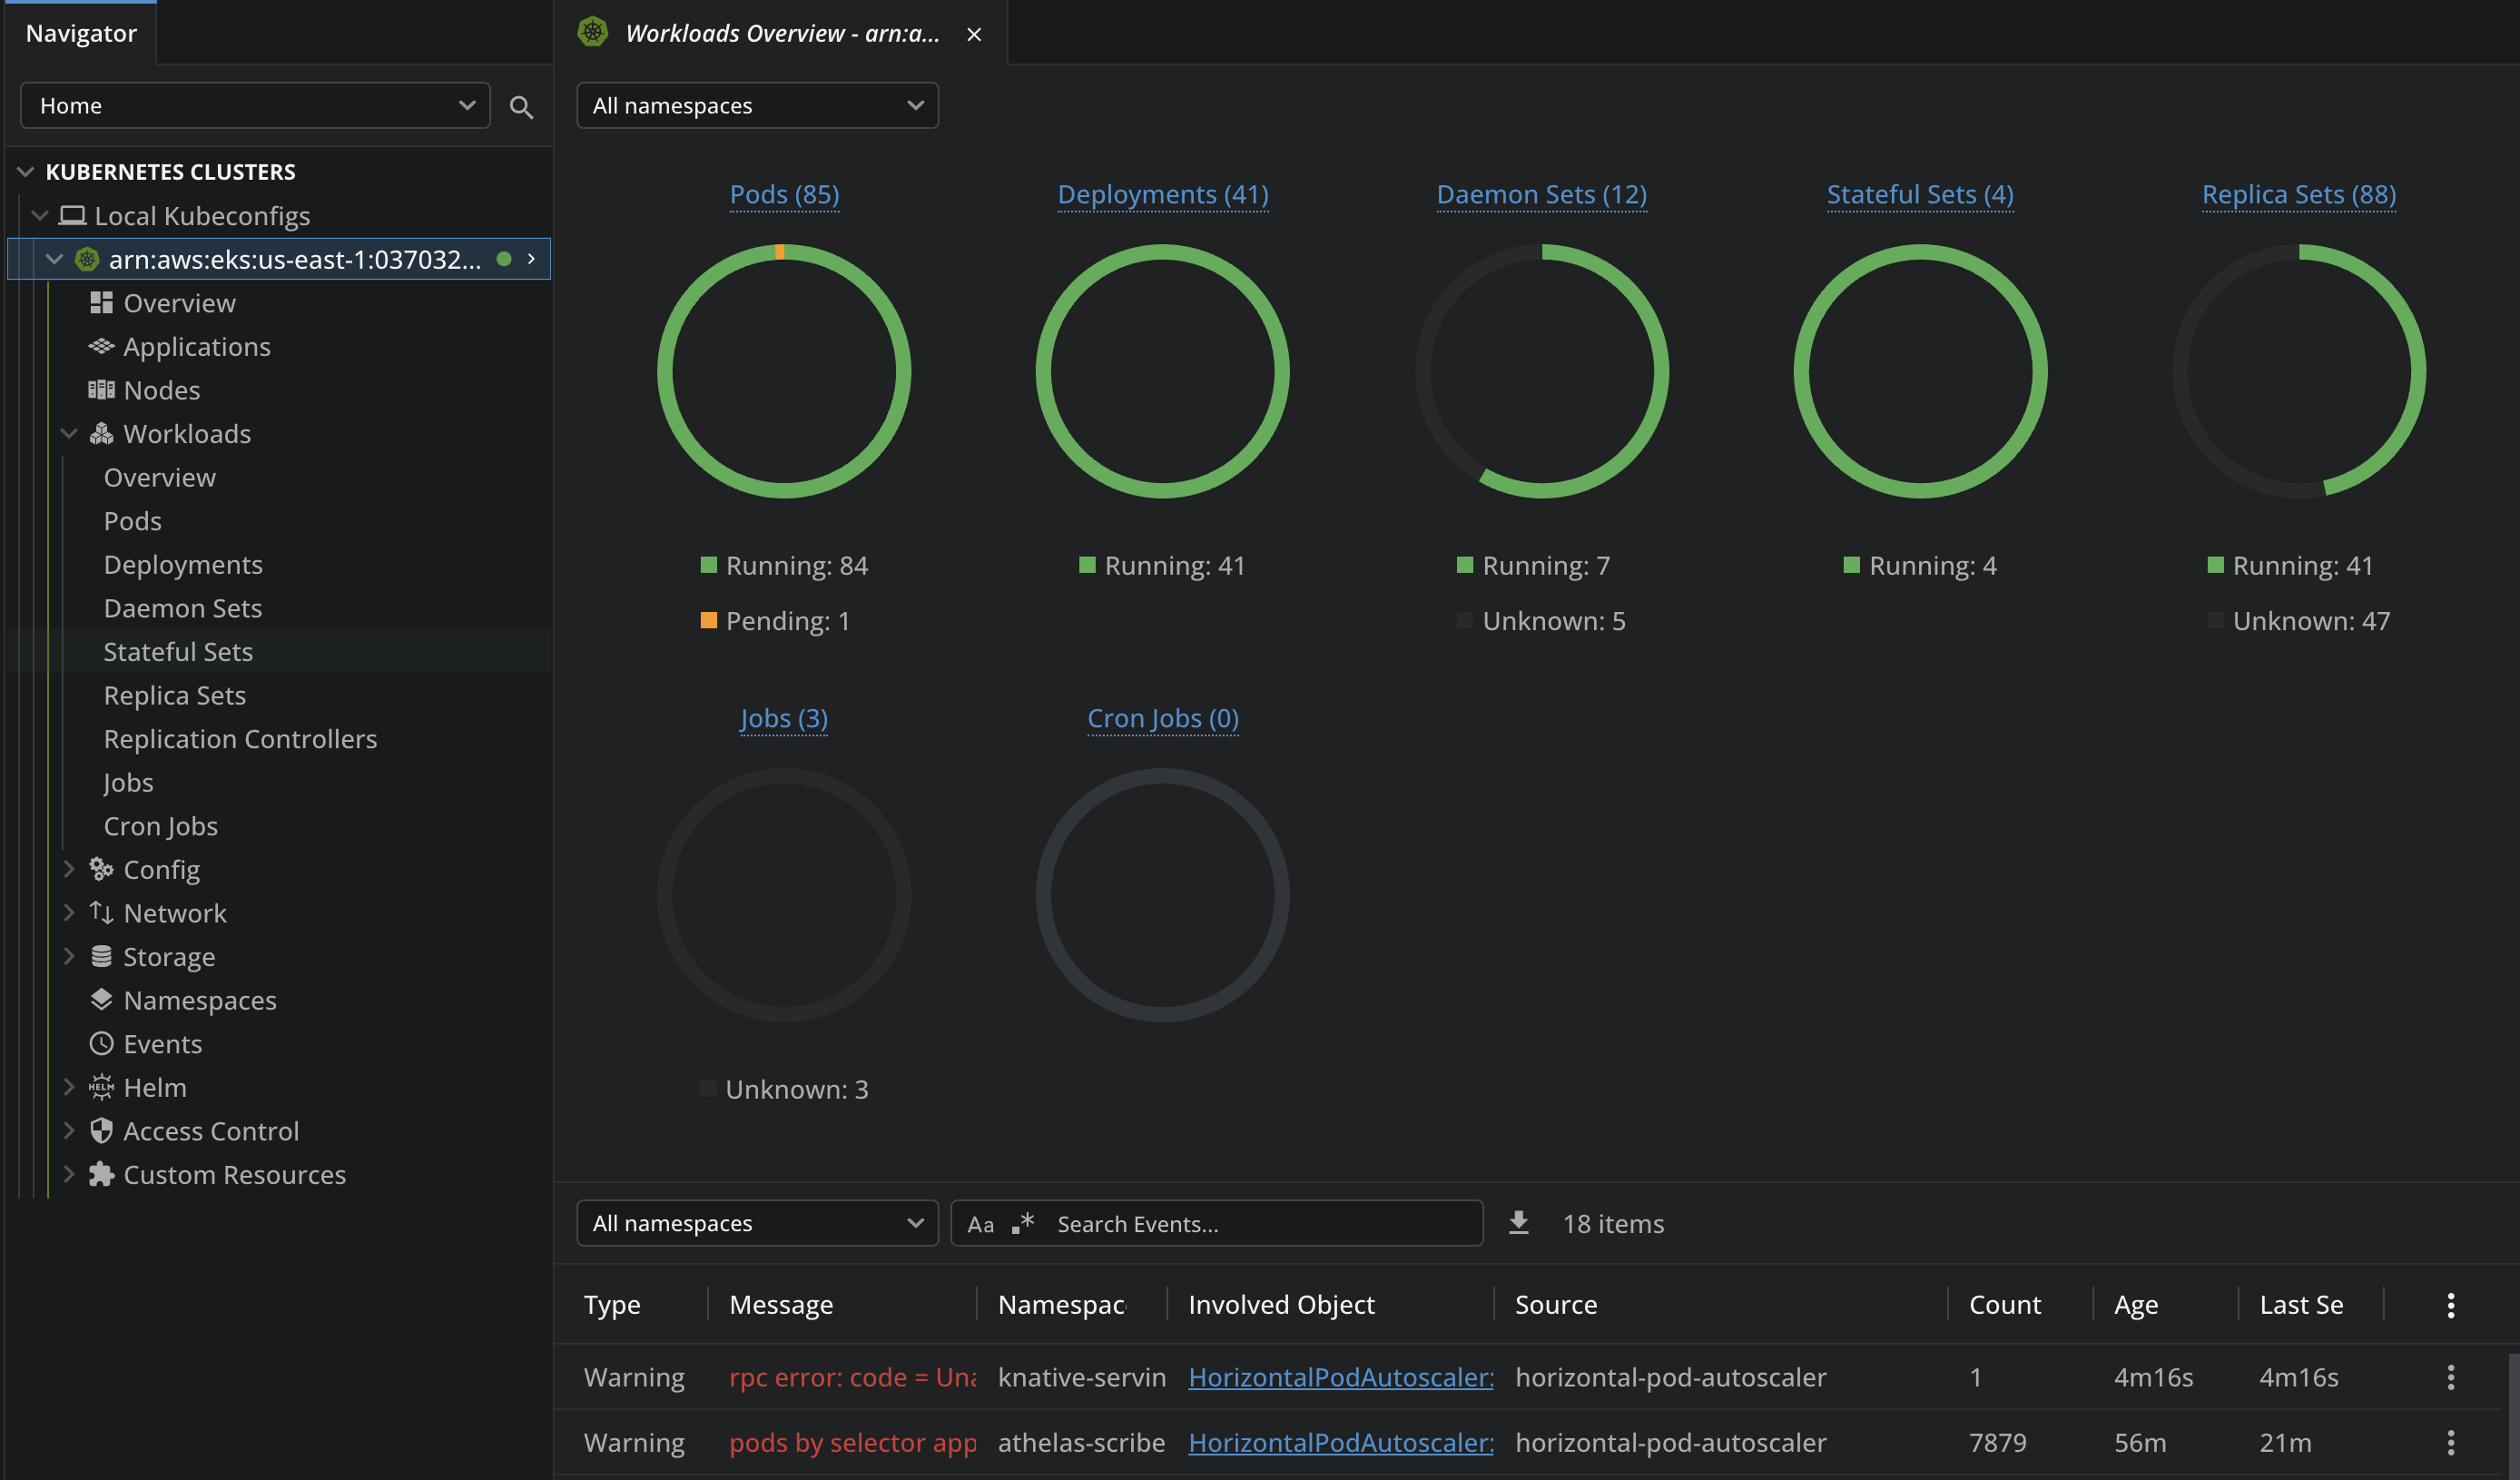
Notes:
socks5hensures DNS for the EKS endpoint is resolved via the proxy (no local DNS leaks).- Keep the SOCKS bind on loopback (
127.0.0.1). - EKS IAM auth (
aws eks get-token) runs locally and does not require the proxy; only the Kubernetes API traffic is proxied. - If requests hang or fail: verify the instance’s route to the private endpoint, security groups, and that you didn’t accidentally NO_PROXY the EKS hostname.
Operational tips: auditing, timeouts, and hardening
Turn on logs now
- Systems Manager → Session Manager → Preferences → Enable logging → pick CloudWatch Logs (90‑day retention) and/or S3 (SSE‑KMS).
- S3 lifecycle: transition after 30–90 days, keep 1 year (or Glacier if you prefer).
Set tight session limits
- Idle timeout: 15m. Max duration: 120m (60m for prod).
- Enable “Terminate sessions when idle”.
Least privilege IAM
- Grant only: StartSession, TerminateSession, Describe/List.
- Restrict to tagged instances (e.g.,
Environment=dev) and allowed documents (AWS-StartPortForwardingSession*,AWS-StartSSHSession).
Kill inbound admin ports
- Remove 22/3389 from Security Groups.
- If SSH is needed locally on the host, bind sshd to loopback only.
Pick the right jump host
- A small utility EC2 in the right subnets with routes/VPCE to targets.
- SG: egress to what you need; no ingress.
Avoid DNS leaks
- Use
socks5h/--socks5-hostname; enable “Proxy DNS” in browsers.
- Use
Keep sessions healthy
- SSH options:
-o ServerAliveInterval=60 -o ExitOnForwardFailure=yes. - If stalls: check connection status, routes, SGs, NACLs.
aws ssm get-connection-status --target <INSERT INSTANCE ID HERE>- SSH options:
Name and tag
- Use named AWS profiles (dev/prod/break‑glass).
- Tag instances (team/env) and enforce with IAM conditions.
Clean up when done
aws ssm describe-sessions --state Active --query 'Sessions[].{Id:SessionId,Target:Target}'
aws ssm terminate-session --session-id <ID>
Conclusion
SSM port tunneling replaces bastions and ad‑hoc firewall changes with auditable, IAM‑controlled, temporary access. The patterns above cover day‑to‑day needs—from SSH and databases to UI access, SOCKS proxies, and remote debugging—without ever opening inbound ports.
Cut the surface area, keep the logs, and move faster.