Your First Kubernetes Cluster on AWS
Remember when you were young and got your first “My First” toy? Maybe it was a kitchen set, a toolbox, or even a chemistry kit. Well, today we’re unboxing something a bit more sophisticated but equally exciting: My First Kubernetes Cluster on AWS!
While this cluster might not make pretend food or mix harmless chemicals, it’s a powerful tool that can revolutionize how you deploy and manage applications. And just like those childhood toys, it’s a great way to learn and experiment in a (mostly) consequence-free environment.
By the end of this blog post, you’ll have a fully functional Kubernetes cluster running on AWS, running a sample application.
All source code is available here.
Table of contents
- Table of contents
- Setup
- Architecture
- Create the Cluster
- Deploy Addons
- Deploy Application
- Testing
- Best Practices for Production Deployments
- Conclusion
Setup
Before we start building our Kubernetes cluster, we need to set up our environment. Here are the tools you’ll need and why they’re important:
Helm: Helm is the package manager for Kubernetes. It simplifies the process of defining, installing, and upgrading even the most complex Kubernetes applications.
Kubectl: Kubectl is the command-line tool for interacting with the Kubernetes API. You’ll use it to deploy applications, inspect and manage cluster resources, and view logs.
AWS CLI: The AWS Command Line Interface is essential for interacting with AWS services. You’ll use it to authenticate with AWS and configure your local environment to work with your EKS cluster.
Terraform: Terraform is an Infrastructure as Code (IaC) tool. It allows you to define and provide data center infrastructure using a declarative configuration language. We’ll use it to create and manage our EKS cluster and associated resources.
While I won’t be going into details on how to set up each of these, click on the links and you’ll get a step-by-step guide on how to install the latest version.
Architecture
Architecture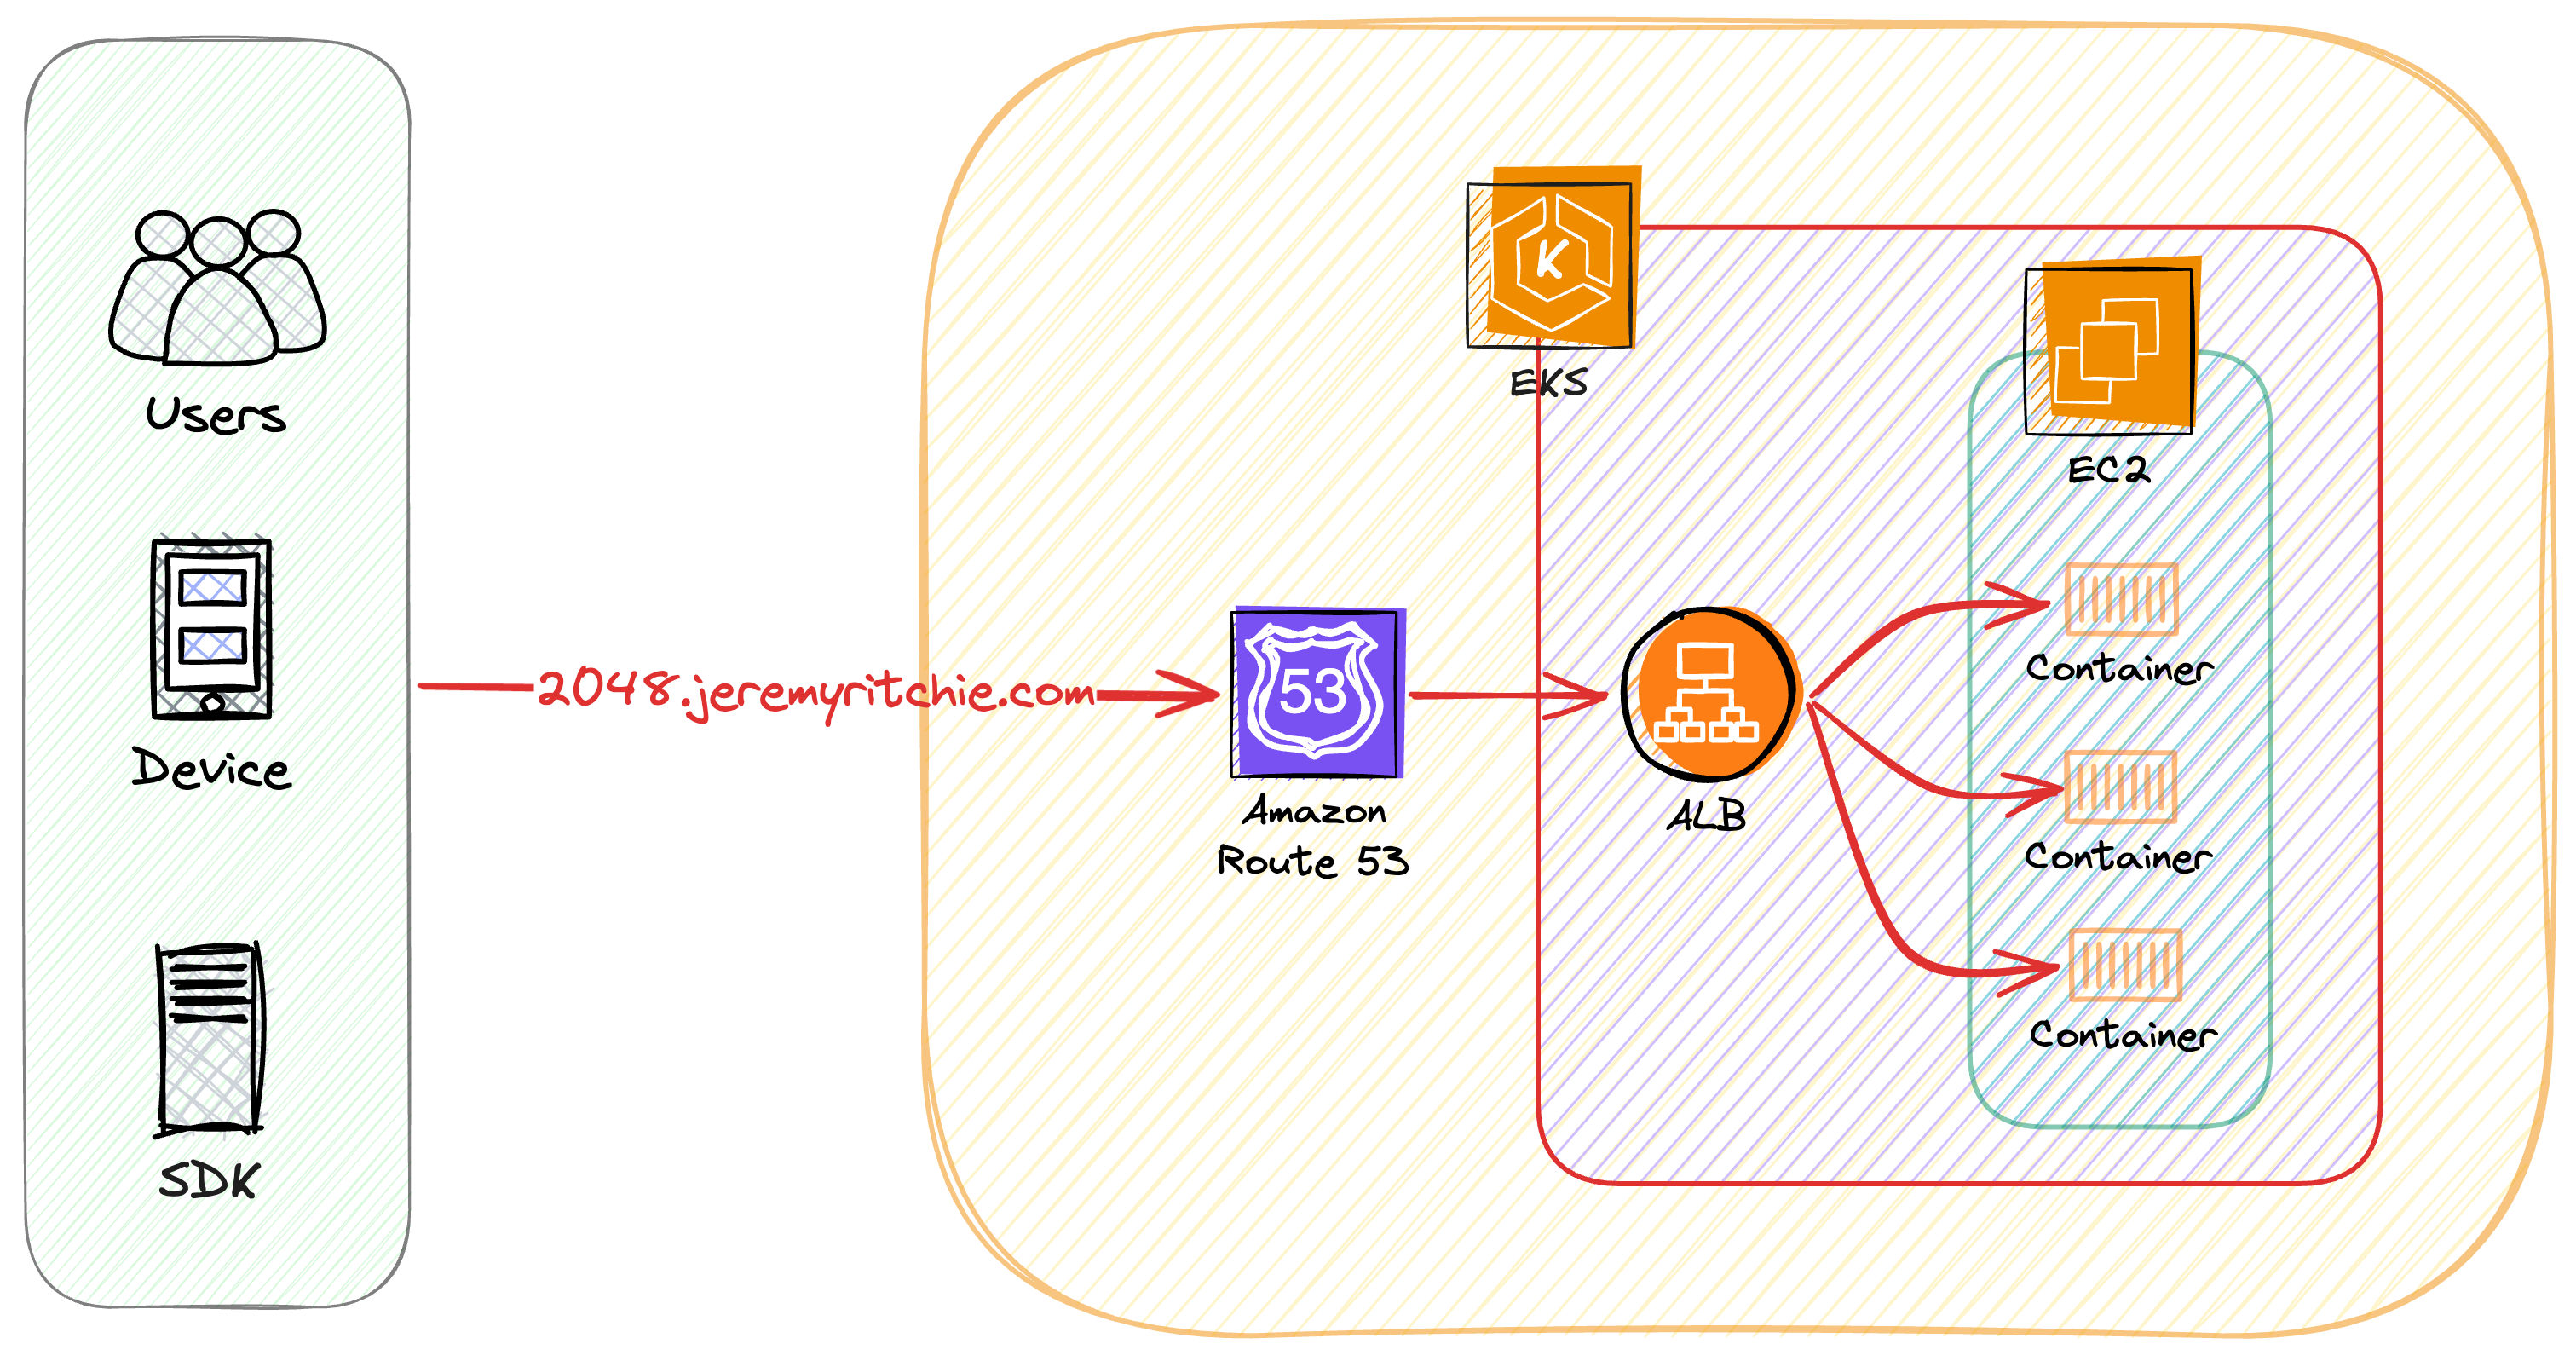
The goal is to run a simple application within a Best-Practice AWS EKS Kubernetes Cluster. You can then build upon this foundation to deploy your own application.
Our cluster architecture incorporates several best practices and advanced features:
EKS managed node groups: These are EC2 instances that EKS automatically provisions and manages for you. They simplify the process of running worker nodes and keep them up to date with the latest security patches.
Network Isolation: Pods are deployed to different subnets than nodes. This enhances IP address management and network isolation, providing an additional layer of security.
Granular Network Control: Every pod has its own IP address and security group. This allows for more precise network controls and can help in implementing micro-segmentation.
Internet Access: Both nodes and pods can access the internet through a NAT Gateway. This allows for outbound internet access while keeping the resources protected from inbound traffic.
Enhanced Pod Density: Pod density is maximized using IP Prefixing on the Node ENI (Elastic Network Interface). This feature allows for a higher number of pods per node by allocating a CIDR block to each ENI instead of individual IP addresses.
Access Control: Access is managed via Cluster Access Manager, which maps to existing AWS SSO IAM Roles. This provides fine-grained access control and integrates well with existing AWS identity management systems.AWS SSO IAM Roles.
It’s important to note that not all node types can be used with this setup. The ENI trunking feature is only supported on certain node types. For example, the t3 family is not supported. Be sure to check the documentation for a full list of supported nodes here.
In addition to these configurations, we are installing several essential add-ons:
AWS Load Balancer Controller: This manages Elastic Load Balancers for Kubernetes services.
External Secrets: This allows you to securely inject secrets from external sources into your Kubernetes resources.
Cluster Autoscaler: This automatically adjusts the number of nodes in your cluster when pods fail to launch due to insufficient resources or when nodes are underutilized.
Metrics Server: This collects resource metrics from Kubelets and exposes them in Kubernetes apiserver through Metrics API for use by Horizontal Pod Autoscaler and Vertical Pod Autoscaler.
Create the Cluster
In this section, we use Terraform to create our EKS cluster. We make use of the AWS EKS Terraform module to easily build a best practice cluster that’s most suitable to our requirements.
Terraform
module "eks" {
  source  = "terraform-aws-modules/eks/aws"
  version = "~> 20.0"

  cluster_name                          = var.cluster_name
  cluster_version                       = var.cluster_version
  cluster_endpoint_private_access       = false
  cluster_endpoint_public_access        = true
  cluster_additional_security_group_ids = [aws_security_group.allow_tls.id]
  authentication_mode                   = "API"

  cluster_addons = {
    vpc-cni = {
      before_compute = true
      most_recent    = true
      configuration_values = jsonencode({
        env = {
          // Deploy Pods to different subnet than nodes
          AWS_VPC_K8S_CNI_CUSTOM_NETWORK_CFG = "true"
          ENI_CONFIG_LABEL_DEF               = "topology.kubernetes.io/zone"
          // Every Pod will have its own IP & Security Group
          ENABLE_POD_ENI                     = "true"
          // Allow pods to talk to internet
          AWS_VPC_K8S_CNI_EXTERNALSNAT       = "true"
          // Enable Prefix Delegation - allowocate IP prefix to Node ENI's instead of secondary IP's. Allow much higher pod density
          ENABLE_PREFIX_DELEGATION           = "true"
          WARM_PREFIX_TARGET                 = "1"
          // network security mode
          POD_SECURITY_GROUP_ENFORCING_MODE  = "standard"
        }
      })
    }
  }

  vpc_id      = module.vpc.vpc_id
  subnet_ids  = module.vpc.private_subnets
  enable_irsa = true

  eks_managed_node_group_defaults = {
    instance_types = var.instance_types
  }

  eks_managed_node_groups = {
    (var.environment) = {
      min_size     = var.cluster_min_size
      max_size     = var.cluster_max_size
      desired_size = var.cluster_desired_size
      block_device_mappings = {
        xvda = {
          device_name = "/dev/xvda"
          ebs = {
            volume_size           = 50
            volume_type           = "gp3"
            encrypted             = true
            kms_key_id            = aws_kms_key.ebs.arn
            delete_on_termination = true
          }
        }
      }
      launch_template_tags = {
        # enable discovery of autoscaling groups by cluster-autoscaler
        "k8s.io/cluster-autoscaler/enabled" : true,
        "k8s.io/cluster-autoscaler/${var.cluster_name}" : "owned",
      }
    }
  }

  enable_cluster_creator_admin_permissions = true

  access_entries = var.access_entries

  tags = {
    Environment = "${var.environment}"
  }
}

# Create data resource for pod subnets
data "aws_subnet" "pod_subnet" {
  for_each = toset(module.vpc.elasticache_subnets)
  id       = each.value
}

#Create ENIConfig for pods to use different subnets from nodes
resource "kubectl_manifest" "eniconfig" {
  for_each  = data.aws_subnet.pod_subnet
  yaml_body = <<-YAML
  apiVersion: crd.k8s.amazonaws.com/v1alpha1
  kind: ENIConfig
  metadata:
    name: ${each.value.availability_zone}
  spec:
    securityGroups:
      - ${aws_security_group.pod_sg.id}
    subnet: ${each.value.id}
  YAML
}
Let’s break down some key parts of this Terraform configuration:
VPC CNI Addon Configuration: The VPC CNI (Container Network Interface) is crucial for networking in EKS. We’re configuring it to:
- Deploy pods to different subnets than nodes
- Give each pod its own IP and security group
- Enable internet access for pods
- Use IP Prefix Delegation for higher pod density
IRSA (IAM Roles for Service Accounts): By setting
enable_irsa = true, we’re enabling IAM roles for service accounts. This is a best practice that allows fine-grained permissions for pods without needing to grant permissions to the entire node.Managed Node Groups: We’re using EKS managed node groups, which simplify the process of running worker nodes. We’re setting min, max, and desired sizes, as well as configuring the EBS volumes for the nodes.
Cluster Autoscaler: We’re adding tags to the launch template that allow the cluster autoscaler to discover and manage these node groups.
ENIConfig: We’re creating ENIConfig resources for each subnet. This allows pods to use different subnets from nodes, enhancing network isolation.
Deploy Addons
With the cluster deployed, we can now proceed with configuring it.
Important Note!
Managing EKS addons is now recommended to be done via a GitOps based approach such as ArgoCD or FluxCD. See here to learn more about the GitOps Bridge Pattern. Addons historically have been managed via Terraform.
For the purposes of simplicity, the addons are deployed via terraform today. Within the code repository, you might notice EKS creation and EKS configuration are separate Terraform projects. This was done to ensure consistency and remove complexity in race conditions for creating and destroying the cluster.
Terraform
module "eks_blueprints_addons" {
  source  = "aws-ia/eks-blueprints-addons/aws"
  version = "~> 1.16" #ensure to update this to the latest/desired version

  cluster_name      = data.terraform_remote_state.eks.outputs.eks.cluster_name
  cluster_endpoint  = data.terraform_remote_state.eks.outputs.eks.cluster_endpoint
  cluster_version   = data.terraform_remote_state.eks.outputs.eks.cluster_version
  oidc_provider_arn = data.terraform_remote_state.eks.outputs.eks.oidc_provider_arn

  enable_aws_load_balancer_controller = true
  enable_external_secrets             = true
  enable_cluster_autoscaler           = true
  enable_metrics_server               = true

  aws_load_balancer_controller = {
    set = [
      {
        name  = "vpcId"
        value = data.terraform_remote_state.eks.outputs.vpc.vpc_id
      },
      {
        name  = "podDisruptionBudget.maxUnavailable"
        value = 1
      }
    ]
  }
  tags = {
    Environment = "${var.environment}"
  }
}
Let’s discuss each of these addons:
AWS Load Balancer Controller: This manages Elastic Load Balancers for Kubernetes services. It’s essential for routing external traffic to your services.
External Secrets: This addon allows you to use external secret management systems (like AWS Secrets Manager) to securely inject secrets into your Kubernetes resources.
Cluster Autoscaler: This automatically adjusts the number of nodes in your cluster when pods fail to launch due to insufficient resources or when nodes are underutilized. It’s crucial for efficient resource utilization.
Metrics Server: This collects resource metrics from Kubelets and exposes them in Kubernetes apiserver through Metrics API. It’s used by features like Horizontal Pod Autoscaler for making scaling decisions.
Deploy Application
Now that our cluster is set up and the necessary addons are in place, we can deploy our application. We’re using a simple 2048 game as our example application. The deployment consists of several Kubernetes resources:
- Namespace: A dedicated namespace for our application
- Deployment: Specifies how to create and update instances of our application
- Service: Exposes the application within the cluster
- Ingress: Manages external access to the services in the cluster
We’re using kubectl_manifest resources in Terraform to apply these Kubernetes manifests. This approach allows us to manage our Kubernetes resources alongside our infrastructure code.
Additionally, we’re setting up TLS for our application:
- Creating an ACM certificate for the application domain
- Setting up Route53 records for DNS validation
- Creating a Route53 record to point to our application’s load balancer
Manifest Files
Namespace
---
apiVersion: v1
kind: Namespace
metadata:
  name: game-2048
Deployment
---
apiVersion: apps/v1
kind: Deployment
metadata:
  namespace: game-2048
  name: deployment-2048
spec:
  selector:
    matchLabels:
      app.kubernetes.io/name: app-2048
  replicas: 5
  template:
    metadata:
      labels:
        app.kubernetes.io/name: app-2048
    spec:
      containers:
      - image: public.ecr.aws/l6m2t8p7/docker-2048:latest
        imagePullPolicy: Always
        name: app-2048
        ports:
        - containerPort: 80
Deployment
---
apiVersion: v1
kind: Service
metadata:
  namespace: game-2048
  name: service-2048
spec:
  ports:
    - port: 80
      targetPort: 80
      protocol: TCP
      name: service-port
  type: ClusterIP
  selector:
    app.kubernetes.io/name: app-2048
Ingress
---
apiVersion: networking.k8s.io/v1
kind: Ingress
metadata:
  namespace: game-2048
  name: ingress-2048
  annotations:
    kubernetes.io/ingress.class: alb
    alb.ingress.kubernetes.io/actions.default: |
      {
        "type": "fixed-response",
        "fixedResponseConfig": {
          "contentType": "text/plain",
          "statusCode": "400",
          "messageBody": "Error"
        }
      }
    alb.ingress.kubernetes.io/scheme: internet-facing
    alb.ingress.kubernetes.io/target-type: ip
    alb.ingress.kubernetes.io/load-balancer-name: jeremyritchie-demo-eks-alb
    alb.ingress.kubernetes.io/listen-ports: '[{"HTTP": 80}, {"HTTPS": 443}]'
    alb.ingress.kubernetes.io/ssl-redirect: "443"
    alb.ingress.kubernetes.io/subnets: eks-demo-public-us-east-1a, eks-demo-public-us-east-1b, eks-demo-public-us-east-1c
    alb.ingress.kubernetes.io/actions.forward-to-service: >
      {"type":"forward","forwardConfig":{"targetGroups":[{"serviceName":"service-2048","servicePort":"service-port"}]}}
    alb.ingress.kubernetes.io/healthcheck-path: /
spec:
  tls:
    - hosts:
        - "2048.jeremyritchie.com"
  rules:
    - http:
        paths:
        - path: /
          pathType: Prefix
          backend:
            service:
              name: forward-to-service
              port:
                name: use-annotation
Terraform
# ~~~~~~~~~~~~~~~~~~~~~~~~~~~~~~~~~~~~~~~~~~~~~~~~~~~~~~~~~~~~~~~~~~~~~~~~~~~~~
# Create a new ACM certificate for the 2048 application
# ~~~~~~~~~~~~~~~~~~~~~~~~~~~~~~~~~~~~~~~~~~~~~~~~~~~~~~~~~~~~~~~~~~~~~~~~~~~~~
resource "aws_acm_certificate" "application_2048" {
  domain_name       = "2048.${var.domain_name}"
  validation_method = "DNS"
}

resource "aws_route53_record" "cert_2048" {
  for_each = {
    for dvo in aws_acm_certificate.application_2048.domain_validation_options : dvo.domain_name => {
      name   = dvo.resource_record_name
      record = dvo.resource_record_value
      type   = dvo.resource_record_type
    }
  }

  allow_overwrite = true
  name            = each.value.name
  records         = [each.value.record]
  ttl             = 60
  type            = each.value.type
  zone_id         = data.aws_route53_zone.primary.zone_id
}

resource "aws_acm_certificate_validation" "application_2048" {
  certificate_arn         = aws_acm_certificate.application_2048.arn
  validation_record_fqdns = [for record in aws_route53_record.cert_2048 : record.fqdn]
}

# ~~~~~~~~~~~~~~~~~~~~~~~~~~~~~~~~~~~~~~~~~~~~~~~~~~~~~~~~~~~~~~~~~~~~~~~~~~~~~
# Deploy the 2048 application
# ~~~~~~~~~~~~~~~~~~~~~~~~~~~~~~~~~~~~~~~~~~~~~~~~~~~~~~~~~~~~~~~~~~~~~~~~~~~~~

resource "kubectl_manifest" "application_2048" {
    for_each  = toset(data.kubectl_path_documents.application_2048.documents)
    yaml_body = each.value
    depends_on = [ module.eks_blueprints_addons, aws_acm_certificate_validation.application_2048 ]
    lifecycle {
      destroy_before_create = true
    }
}

# ~~~~~~~~~~~~~~~~~~~~~~~~~~~~~~~~~~~~~~~~~~~~~~~~~~~~~~~~~~~~~~~~~~~~~~~~~~~~~
# Create a DNS record for the 2048 application
# ~~~~~~~~~~~~~~~~~~~~~~~~~~~~~~~~~~~~~~~~~~~~~~~~~~~~~~~~~~~~~~~~~~~~~~~~~~~~~

resource "time_sleep" "wait_for_app" {
  depends_on = [ kubectl_manifest.application_2048 ]
  create_duration = "300s"
}

resource "aws_route53_record" "application_2048" {
  zone_id = data.aws_route53_zone.primary.zone_id
  name    = "2048.jeremyritchie.com"
  type    = "A"

  alias {
    name                   = data.aws_lb.application_2048.dns_name
    zone_id                = data.aws_lb.application_2048.zone_id
    evaluate_target_health = true
  }
}
Testing
First, let’s authenticate to our cluster and see if our application exists!
# Setup AWS SSO profile
aws configure sso
# Authenticate with AWS SSO
aws sso login --profile <profile name>
# Update kube config
aws eks update-kubeconfig --region <region>--name <cluster name> --profile <profile name>

# Get all namespaces
kubectl get ns

# Get all resources in game-2048 namespace
kubectl get all -n game-2048
Kubectl output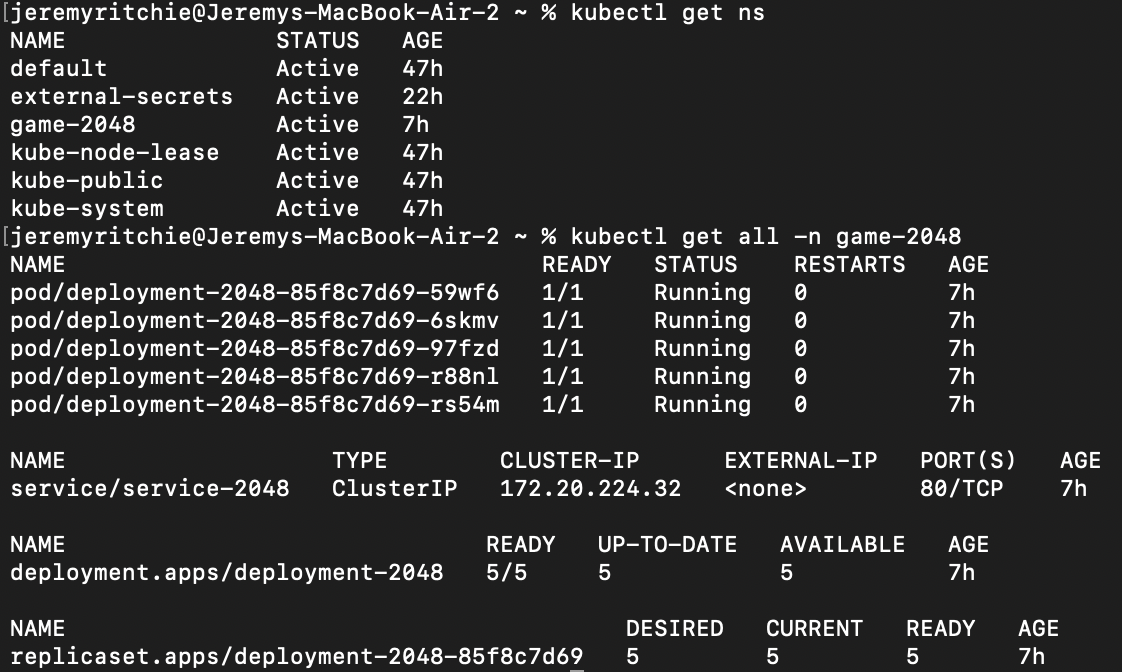
Great! Everything looks in order. Let’s check and see if the load balancer controller has created our load balancer correctly.
ALB created by AWS Load Balancer Controller
After deploying everything, you should be able to access your application at the specified domain (in this case, 2048.jeremyritchie.com). The application should be running securely over HTTPS on our Kubernetes cluster!
2048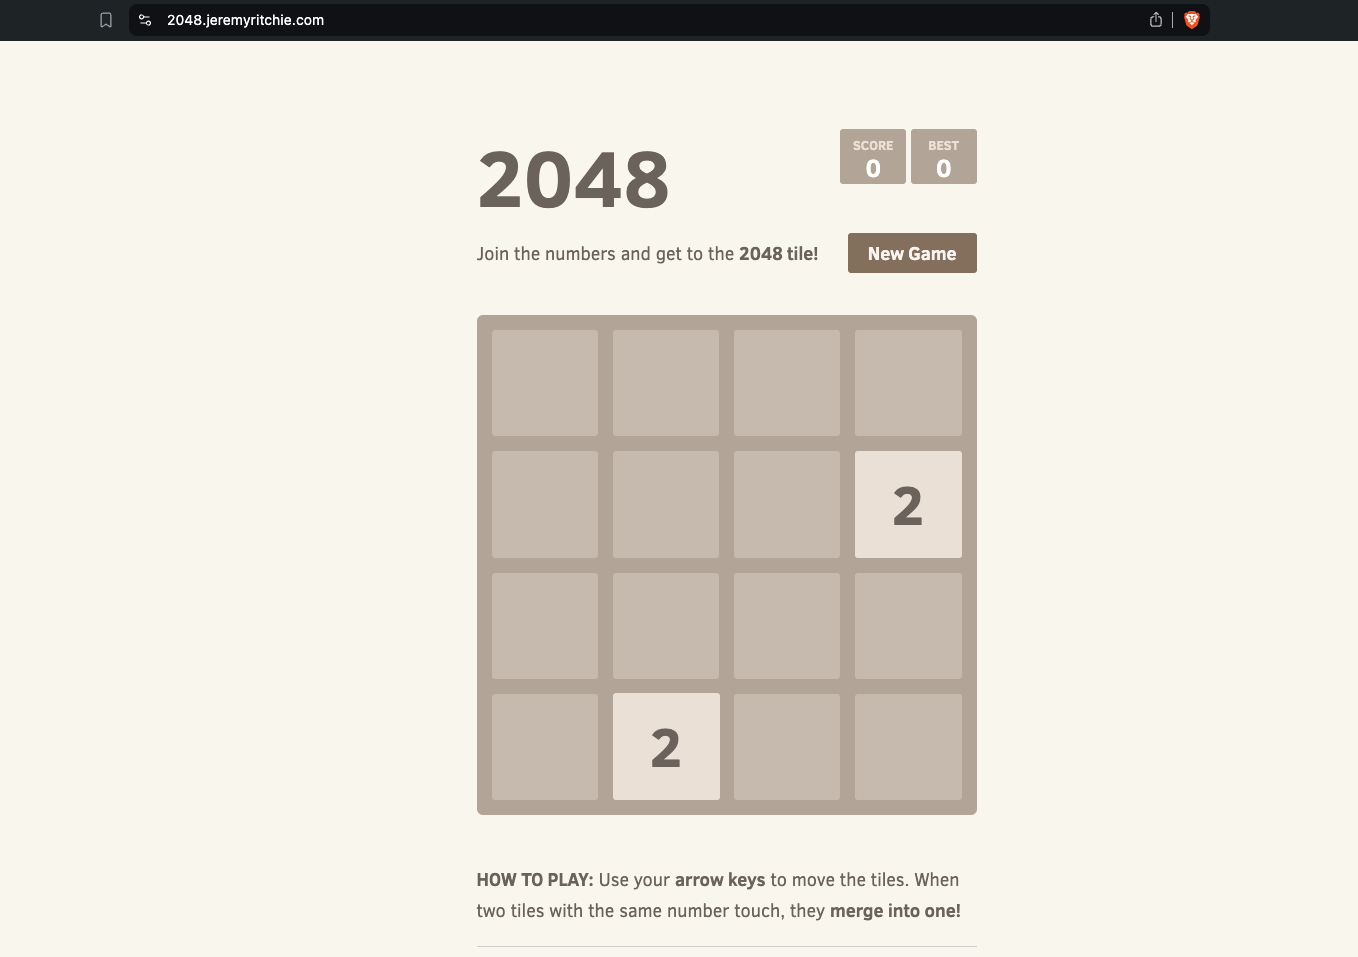
If you’re having trouble accessing your application, here are some troubleshooting steps:
- Check that all pods are running:
kubectl get pods -n game-2048 - Check the logs of your pods:
kubectl logs <pod-name> -n game-2048 - Verify that your ingress is correctly configured:
kubectl describe ingress -n game-2048 - Check that your DNS record is pointing to the correct load balancer
- Verify that your SSL/TLS certificate has been issued and is active in ACM
Best Practices for Production Deployments
When moving to production, consider the following best practices:
- High Availability: Deploy across multiple Availability Zones.
- Security: Implement network policies, use Pod Security Standards, and regularly update and patch your systems.
- Monitoring and Logging: Implement comprehensive monitoring and centralized logging.
- Backup and Disaster Recovery: Regularly backup etcd and have a disaster recovery plan.
- GitOps: Implement GitOps practices for managing cluster and application configurations.
- Resource Management: Use resource requests and limits for all containers.
- Update Strategy: Have a strategy for keeping your cluster and applications up to date.
Conclusion
We’ve successfully set up your first Kubernetes cluster on AWS using EKS and Terraform. We’ve deployed a simple application and secured it with HTTPS.
Remember, this is just the beginning. With this foundation, you can now start deploying your own applications, experimenting with different Kubernetes features, and scaling your infrastructure as needed.
Happy Kuberneting!