Hosting multiple applications together with SNI and Application Load Balancers

An extremely common cloud migration strategy is the lift & shift. This involves minimal or no changes to the application or data during the migration into the cloud.
Simultaneously, a common practice for businesses who operate on-prem is to run multiple applications on a single virtual machine.
Combine the most common cloud migration with a common on-prem application hosting practice, and boom! You’ve got a non-cloud native requirement. Let’s solve this using the cloud tools available to us within AWS.
In today’s blog post i’ll discuss the solutions AWS has to easily do just that. I have created a working example using AWS CDK to demonstrate it’s simplicity.
Table of contents
- Table of contents
- The Challenge With Lift & Shift
- Introducing Server Name Indication (SNI)
- Architecture
- Demo
- ALB
- Putting it all together
- Conclusion
The Challenge With Lift & Shift
When lifting and shifting applications to the cloud, a common challenge arises when a customer has multiple applications running on the same on-premises server. They often wish to consolidate and continue running these applications on a single EC2 instance after migration.
However, traditional load balancers in AWS require each application to have its own load balancer, listener, and set of infrastructure. This can get complex and expensive very quickly.
Introducing Server Name Indication (SNI)
Fortunately, AWS Application Load Balancers support a technology called Server Name Indication (SNI) that solves this problem. See Caylent’s very own Randall Hunt introduce this feature back in 2017 when he use to work for AWS here.
SNI allows the client to indicate the hostname it is trying to connect to at the start of the TLS handshake process. This enables the Application Load Balancer choose the correct SSL/TLS Certificate and send it back to the client. The ALB can then route each request to the appropriate target group based on listener rules.
Some key benefits of using SNI with AWS Application Load Balancers:
- Resource Consolidation
- By running multiple apps on fewer EC2 instances behind a shared ALB, costs are reduced through resource consolidation.
- Architectural Simplicity
- The overall architecture is simpler with a single load balancer handling routing and SSL for multiple apps.
- Automated Certificate Management
- AWS ALB automatically selects the most appropriate SSL certificate for each HTTPS request.
Some key tradeoffs to consider with the shared infrastructure approach:
Resource Coupling
- Since multiple applications run on the same server behind a shared Application Load Balancer, there is tighter coupling between the app resources. A disruption to the load balancer or VMs would affect all applications.
Lack of Independent Scaling
- The applications cannot be individually auto scaled based on their specific demands, because they share server. Scaling decisions become more complex when managing multiple apps on the same resources.
Performance Implications
- There is potential for noisy neighbor issues if a traffic spike for one application impacts the performance of others on the same server. Careful capacity planning helps mitigate this concern.
While these tradeoffs exist, the simplicity and cost savings of consolidating to shared infrastructure may outweigh the drawbacks for some workloads. The risks can be managed through monitoring, instance sizing, and setting capacity buffers.
Architecture
Demo
This application is open-source and is available here
ECS
First we need to create a single host that is running multiple applications on it.
Historically within my work as a Cloud Architect this has been Windows IIS applications. I’m going to save myself the cost and extra time of building that and instead run multiple NGINX containers within a AWS ECS Fargate Task.
This will result in a single network interface for multiple web applications.
- One is called red, running on port 8080.
- The other is called blue, running on port 8081.
Let’s see what that looks like in CDK:
const cluster = new ecs.Cluster(this, 'Cluster', {
    vpc: props.baseStack.vpc,
});

const taskDefinition = new ecs.FargateTaskDefinition(this, 'TaskDef', {
    memoryLimitMiB: 512,
    cpu: 256,
    runtimePlatform: {
        operatingSystemFamily: ecs.OperatingSystemFamily.LINUX,
        cpuArchitecture: ecs.CpuArchitecture.ARM64,
    }
});

taskDefinition.executionRole?.attachInlinePolicy(new iam.Policy(this, 'task-policy', {
    statements: [new iam.PolicyStatement({
        actions: [
            'ecr:GetAuthorizationToken',
            'ecr:BatchCheckLayerAvailability',
            'ecr:GetDownloadUrlForLayer',
            'ecr:BatchGetImage',
            'logs:CreateLogStream',
            'logs:PutLogEvents',
        ],
        resources: ['*'],
    })],
    }));

taskDefinition.addContainer('BlueContainer', {
    image: ecs.ContainerImage.fromAsset(path.resolve(__dirname, '../../blue')),
    memoryLimitMiB: 256,
    cpu: 128,
    portMappings: [{ containerPort: 8081, hostPort: 8081 }],
    logging: ecs.LogDrivers.awsLogs({ streamPrefix: 'blue' }),
    entryPoint: ['/docker-entrypoint.sh'],
    command: ['nginx', '-g', 'daemon off;'],
});

taskDefinition.addContainer('RedContainer', {
    image: ecs.ContainerImage.fromAsset(path.resolve(__dirname, '../../red')),
    memoryLimitMiB: 256,
    cpu: 128,
    portMappings: [{ containerPort: 8080, hostPort: 8080 }],
    logging: ecs.LogDrivers.awsLogs({ streamPrefix: 'red' }),
    entryPoint: ['/docker-entrypoint.sh'],
    command: ['nginx', '-g', 'daemon off;'],
});

this.service = new ecs.FargateService(this, 'Service', {
    cluster: cluster,
    taskDefinition: taskDefinition,
    desiredCount: 1,
    assignPublicIp: true,
});
The Docker images themselves are exceptionally simple as well. Let’s have a quick look at the red docker file.
FROM arm64v8/nginx:mainline-alpine
EXPOSE 8080
COPY index.html /usr/share/nginx/html
COPY default.conf /etc/nginx/conf.d/
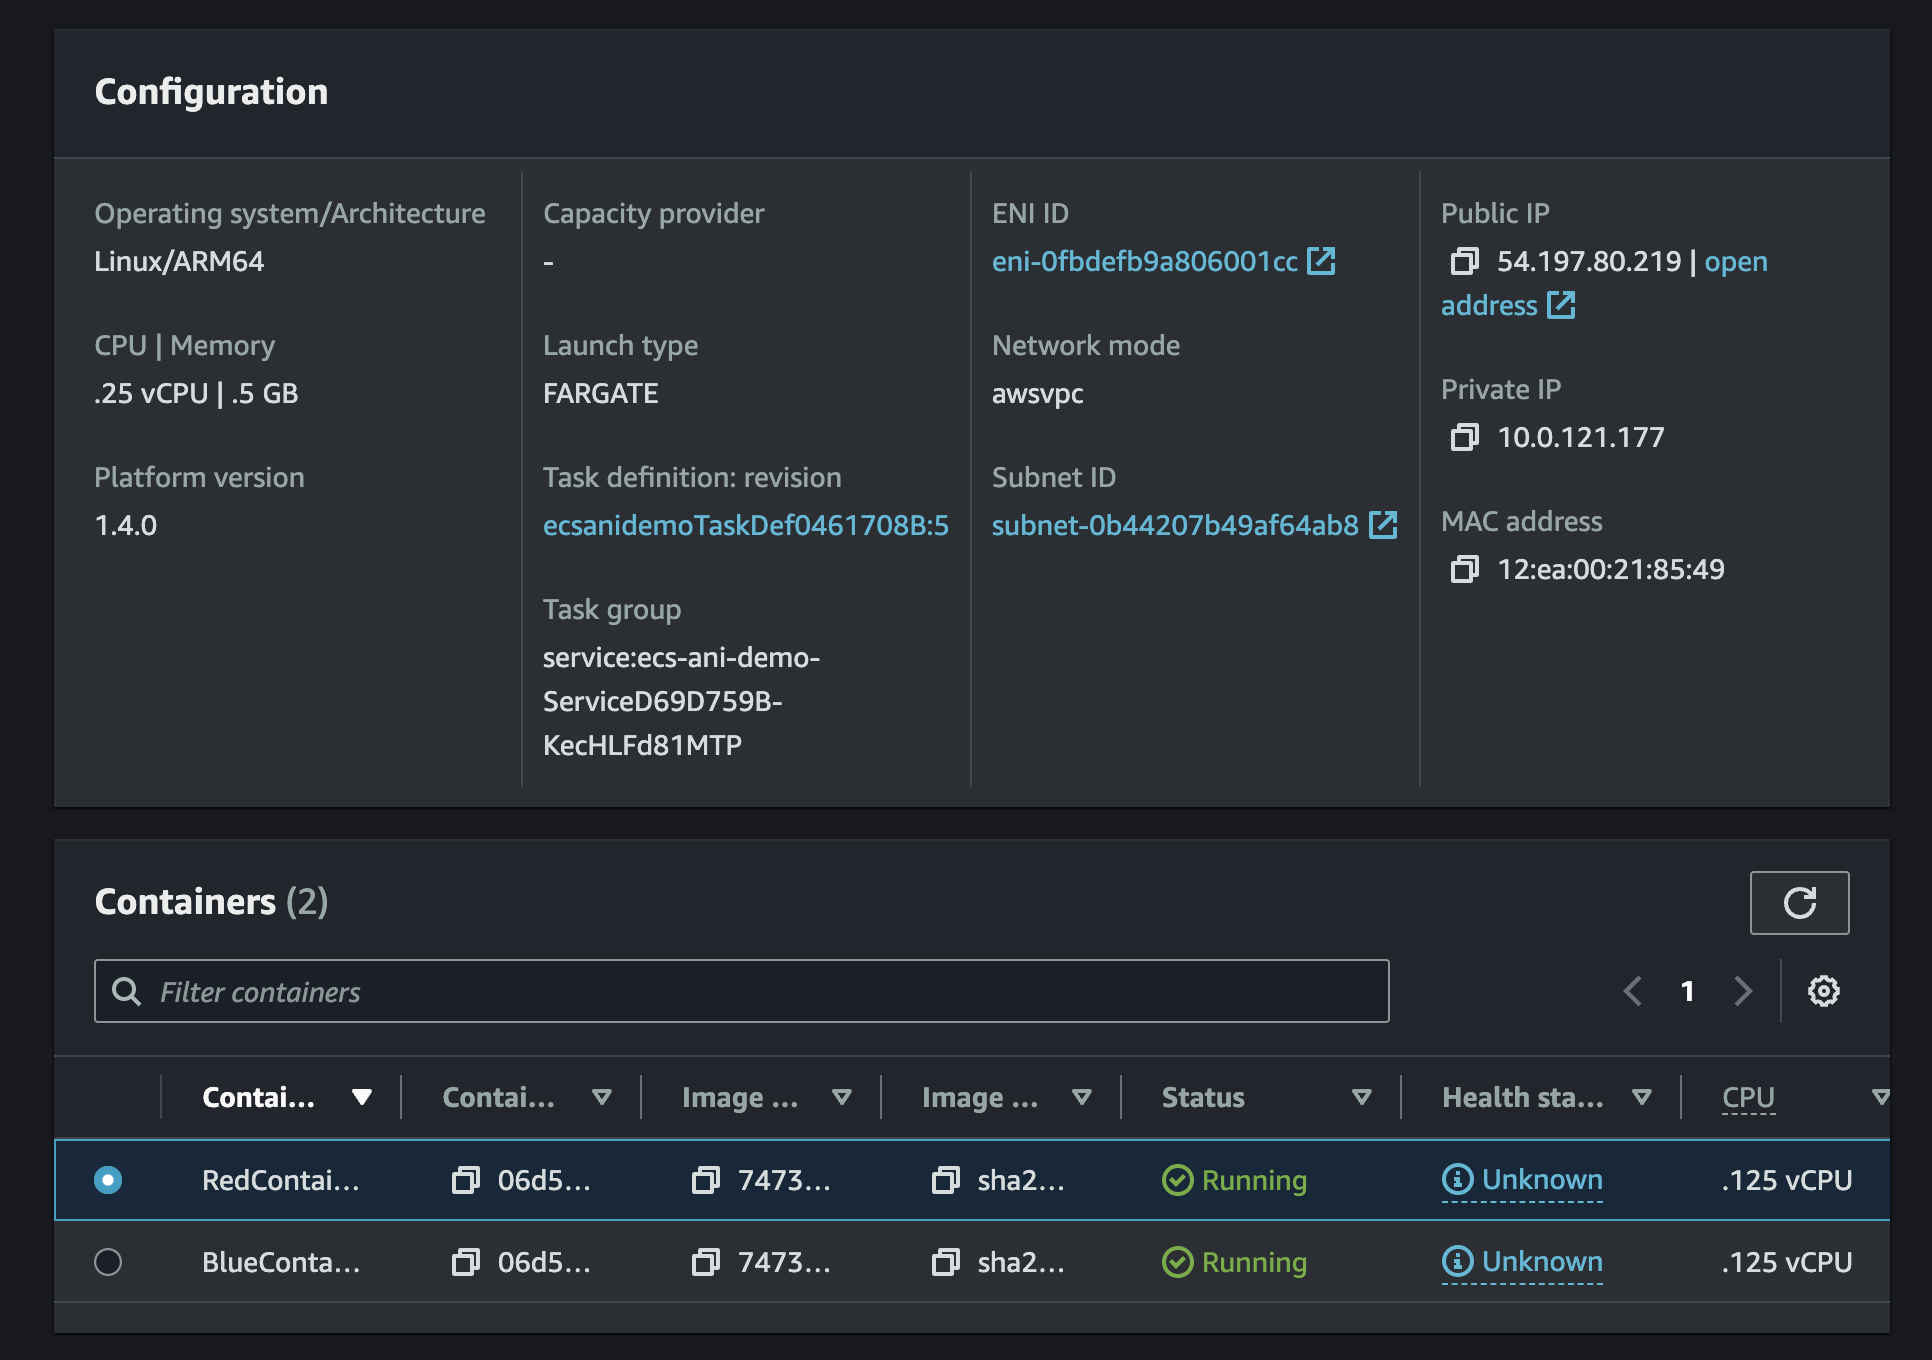
Now that’s been created, let’s check it out in AWS.
We can see there is a task with a single network interface, but with two running containers. Each container is running a different web application.
ALB
Now that our application is running, we need to put the load balancer in front with the multiple SSL/TLS certificates attached to it. SNI will work it’s magic automatically, but the routing of traffic to the same host over a different port will not - so let’s create that too!
const alb = new elbv2.ApplicationLoadBalancer(this, 'ALB', {
    vpc: props.baseStack.vpc,
    internetFacing: true,
});

const redTargetGroup = new elbv2.ApplicationTargetGroup(this, 'RedTargetGroup', {
    vpc: props.baseStack.vpc,
    port: 8080,
    protocol: elbv2.ApplicationProtocol.HTTP,
    targetType: elbv2.TargetType.IP,
    targets: [props.ecsStack.service],
});

props.ecsStack.service.connections.allowFrom(alb, ec2.Port.tcp(8080));

const blueTargetGroup = new elbv2.ApplicationTargetGroup(this, 'BlueTargetGroup', {
    vpc: props.baseStack.vpc,
    port: 8081,
    protocol: elbv2.ApplicationProtocol.HTTP,
    targetType: elbv2.TargetType.IP,
    targets: [props.ecsStack.service],
});

props.ecsStack.service.connections.allowFrom(alb, ec2.Port.tcp(8081));

const https = alb.addListener('Listener', {
    port: 443,
    certificates: [props.baseStack.redCert, props.baseStack.blueCert],
    protocol: elbv2.ApplicationProtocol.HTTPS,
    defaultAction: elbv2.ListenerAction.fixedResponse(404, {
        contentType: "text/plain",
        messageBody: 'Not Found',
    }),
});

alb.addListener('HTTP', {
    port: 80,
    protocol: elbv2.ApplicationProtocol.HTTP,
    defaultAction: elbv2.ListenerAction.redirect({
        protocol: 'HTTPS',
        port: '443',
    }),
});

new elbv2.ApplicationListenerRule(this, 'BlueRule', {
    listener: https,
    priority: 1,
    conditions: [
        elbv2.ListenerCondition.hostHeaders(['blue.jeremyritchie.com']),
    ],
    action: elbv2.ListenerAction.forward([blueTargetGroup]),
});

new elbv2.ApplicationListenerRule(this, 'RedRule', {
    listener: https,
    priority: 2,
    conditions: [
        elbv2.ListenerCondition.hostHeaders(['red.jeremyritchie.com']),
    ],
    action: elbv2.ListenerAction.forward([redTargetGroup]),
});

new route53.ARecord(this, 'BlueRecord', {
    zone: props.baseStack.hostedZone,
    target: route53.RecordTarget.fromAlias(new route53Targets.LoadBalancerTarget(alb)),
    recordName: 'blue',
});

new route53.ARecord(this, 'RedRecord', {
    zone: props.baseStack.hostedZone,
    target: route53.RecordTarget.fromAlias(new route53Targets.LoadBalancerTarget(alb)),
    recordName: 'red',
});
Let’s quickly highlight everything of significance here:
- Target Groups
- One per application (red & blue)
- Target Group port matches the application port
- The ECS Service is the registered target for both Target Groups.
- Listeners
- HTTP forwards to HTTPS
- HTTPS has two certificates, red and blue.
- Listener Rules
- If blue host header matches, forward to blue target group
- If red host header matches, forward to red target group
- Default action if nothing matches is 404.
Now let’s check this out in AWS.
Application Load Balancer Certificates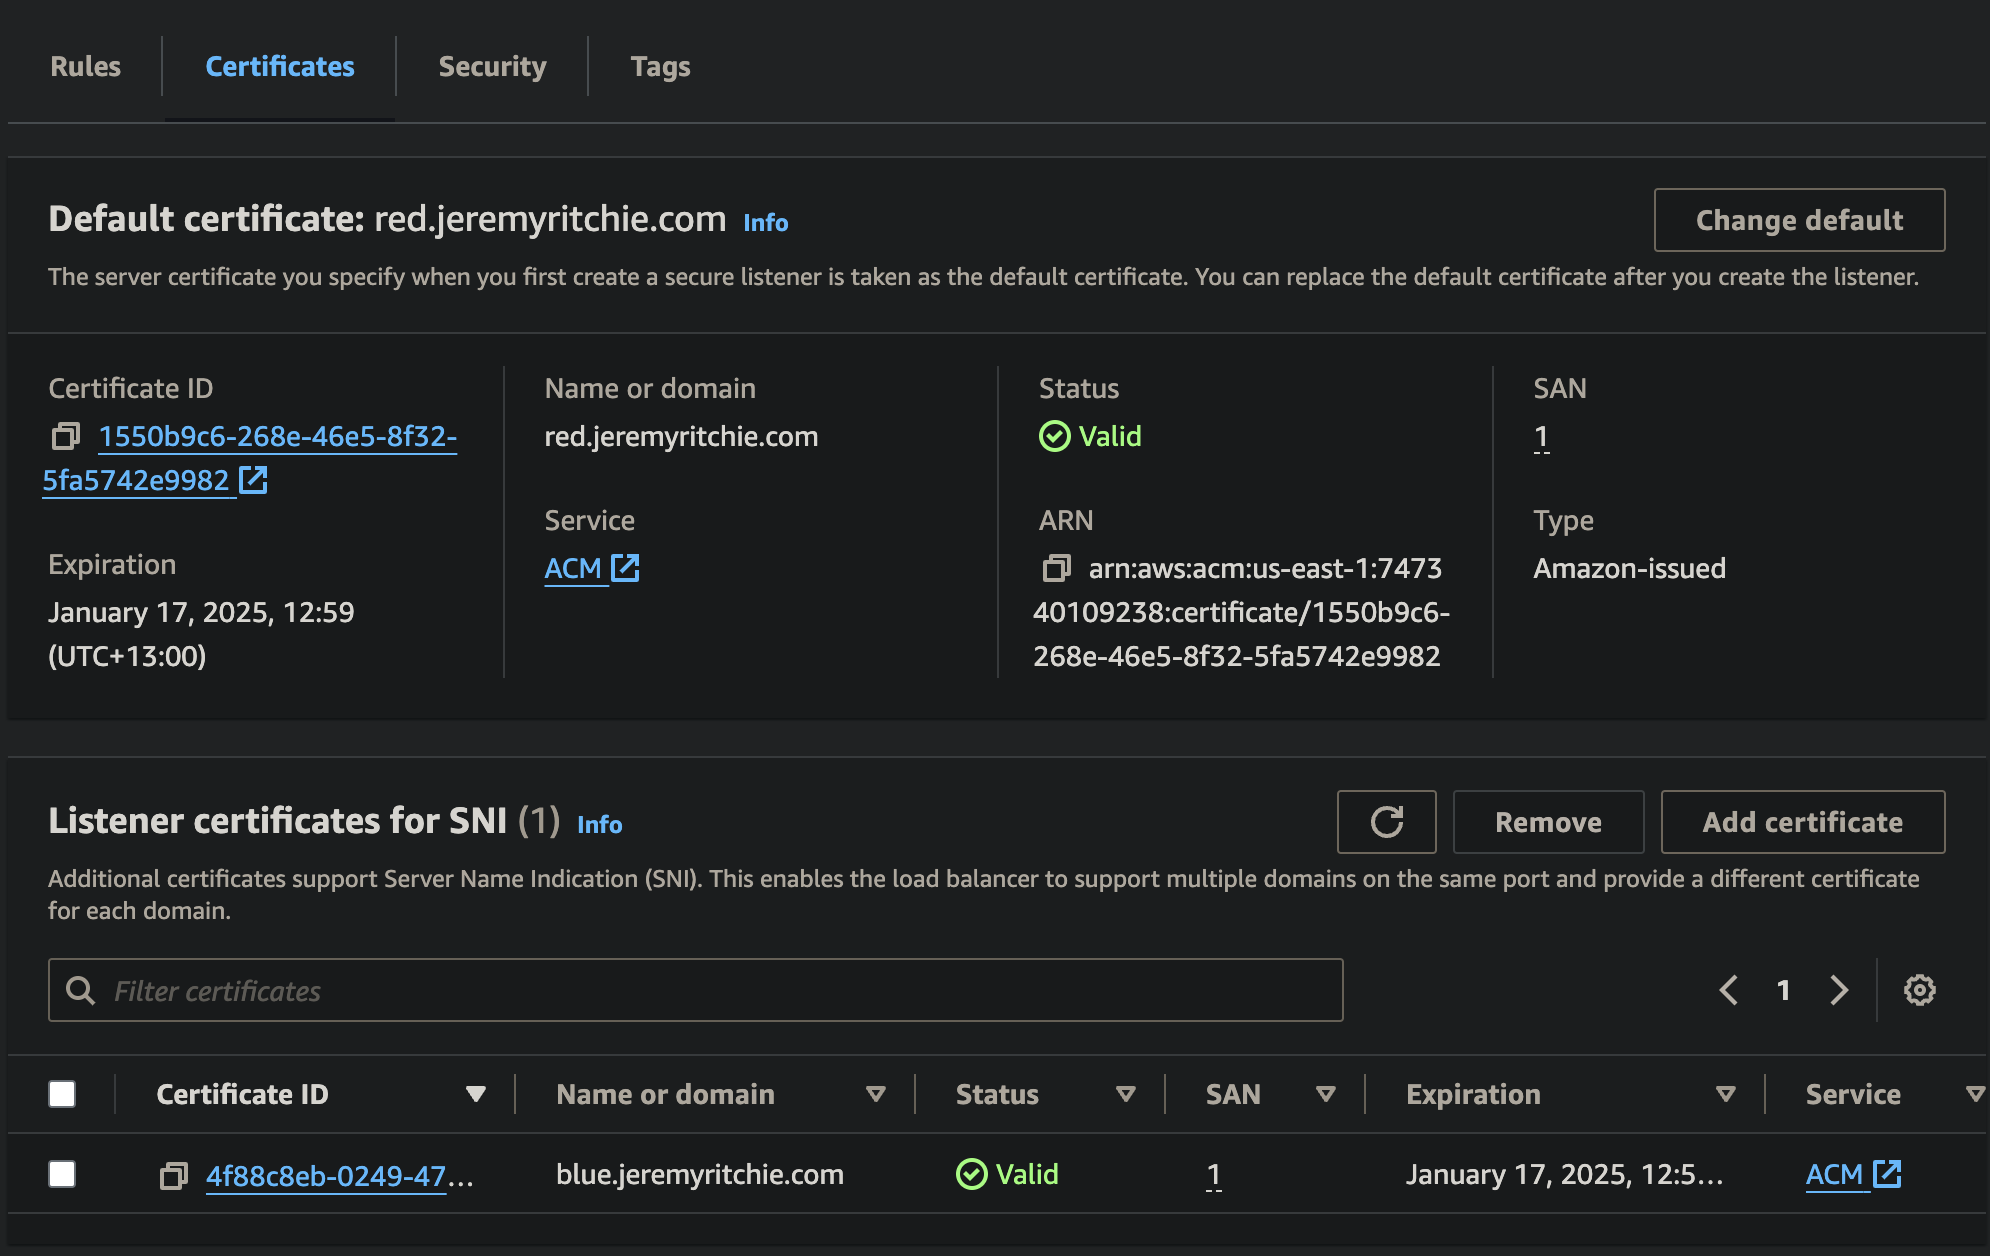

Notice there is a default certificate, and then an additional certificate. This means if a client connects to red.jeremyritchie.com, they will use the default certificate. If a client connects to blue.jeremyritchie.com, SNI will be used and the additional blue certificate will be used.
Application Load Balancer Rules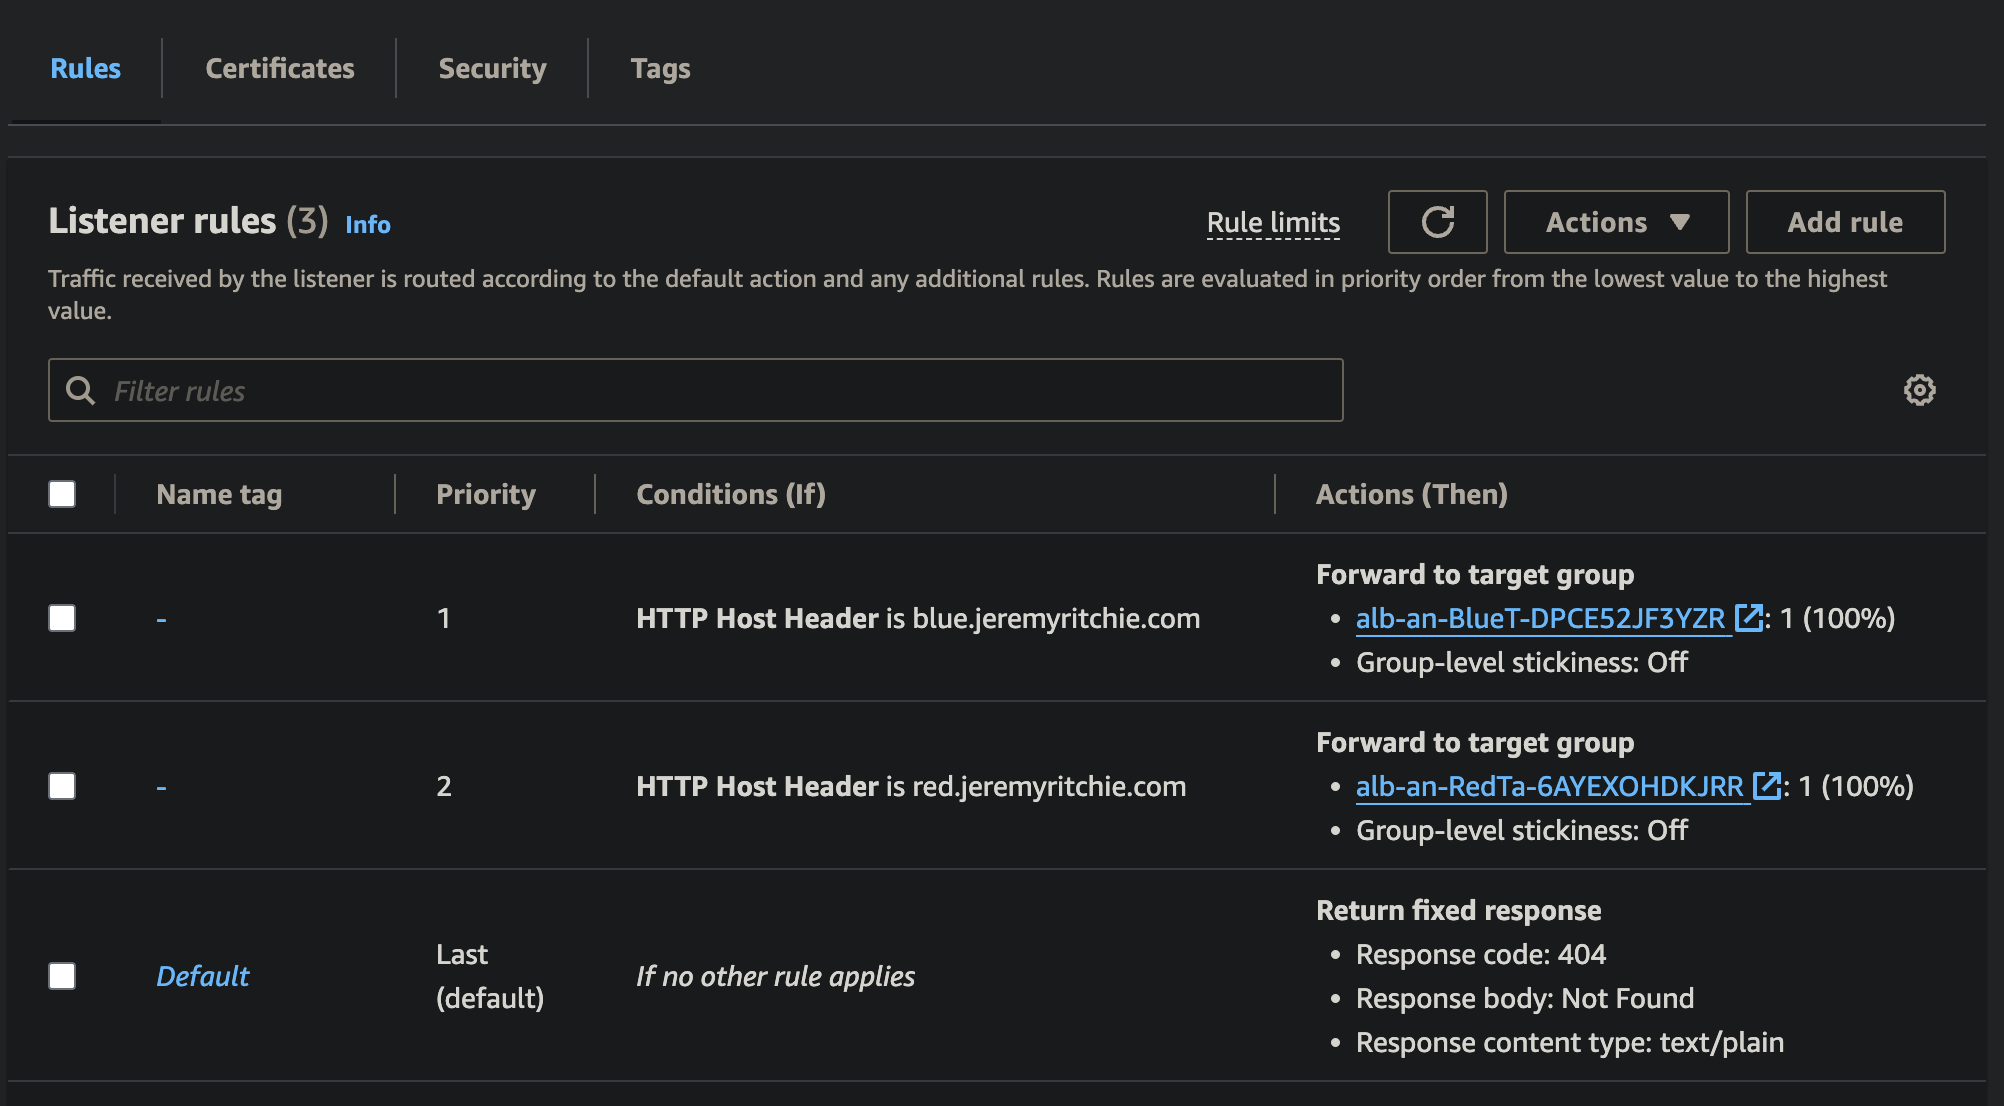

Once SSL/TLS has been terminated, the request needs to be routed to the server. This happens to be the exact same server for red & blue, however the port is different.
By creating a rule matching the host header, we can route the request to the appropriate target group, which will forward the request to the server on the necessary port.
Putting it all together
Red Application Red HTTPS Certificate Blue Application Blue HTTPS Certificate

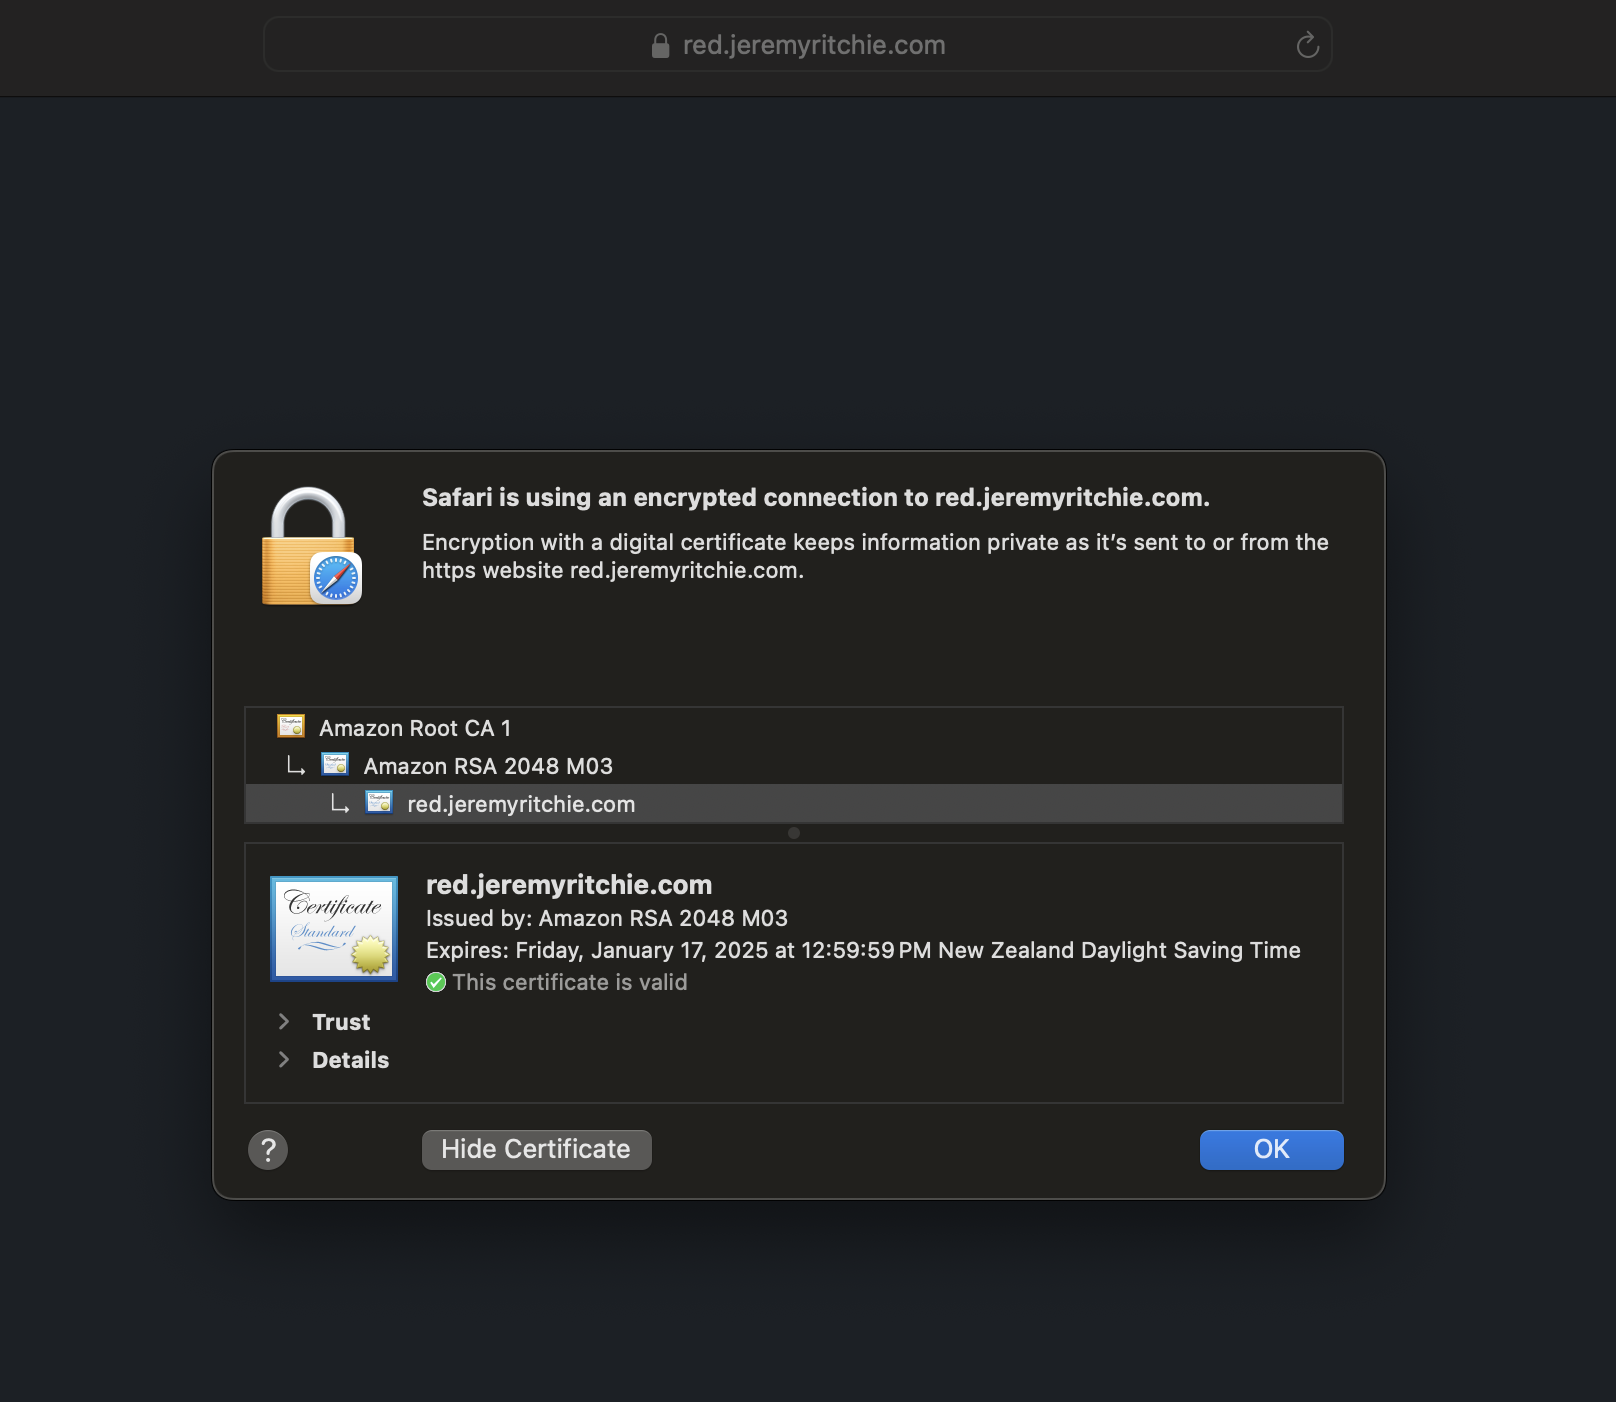


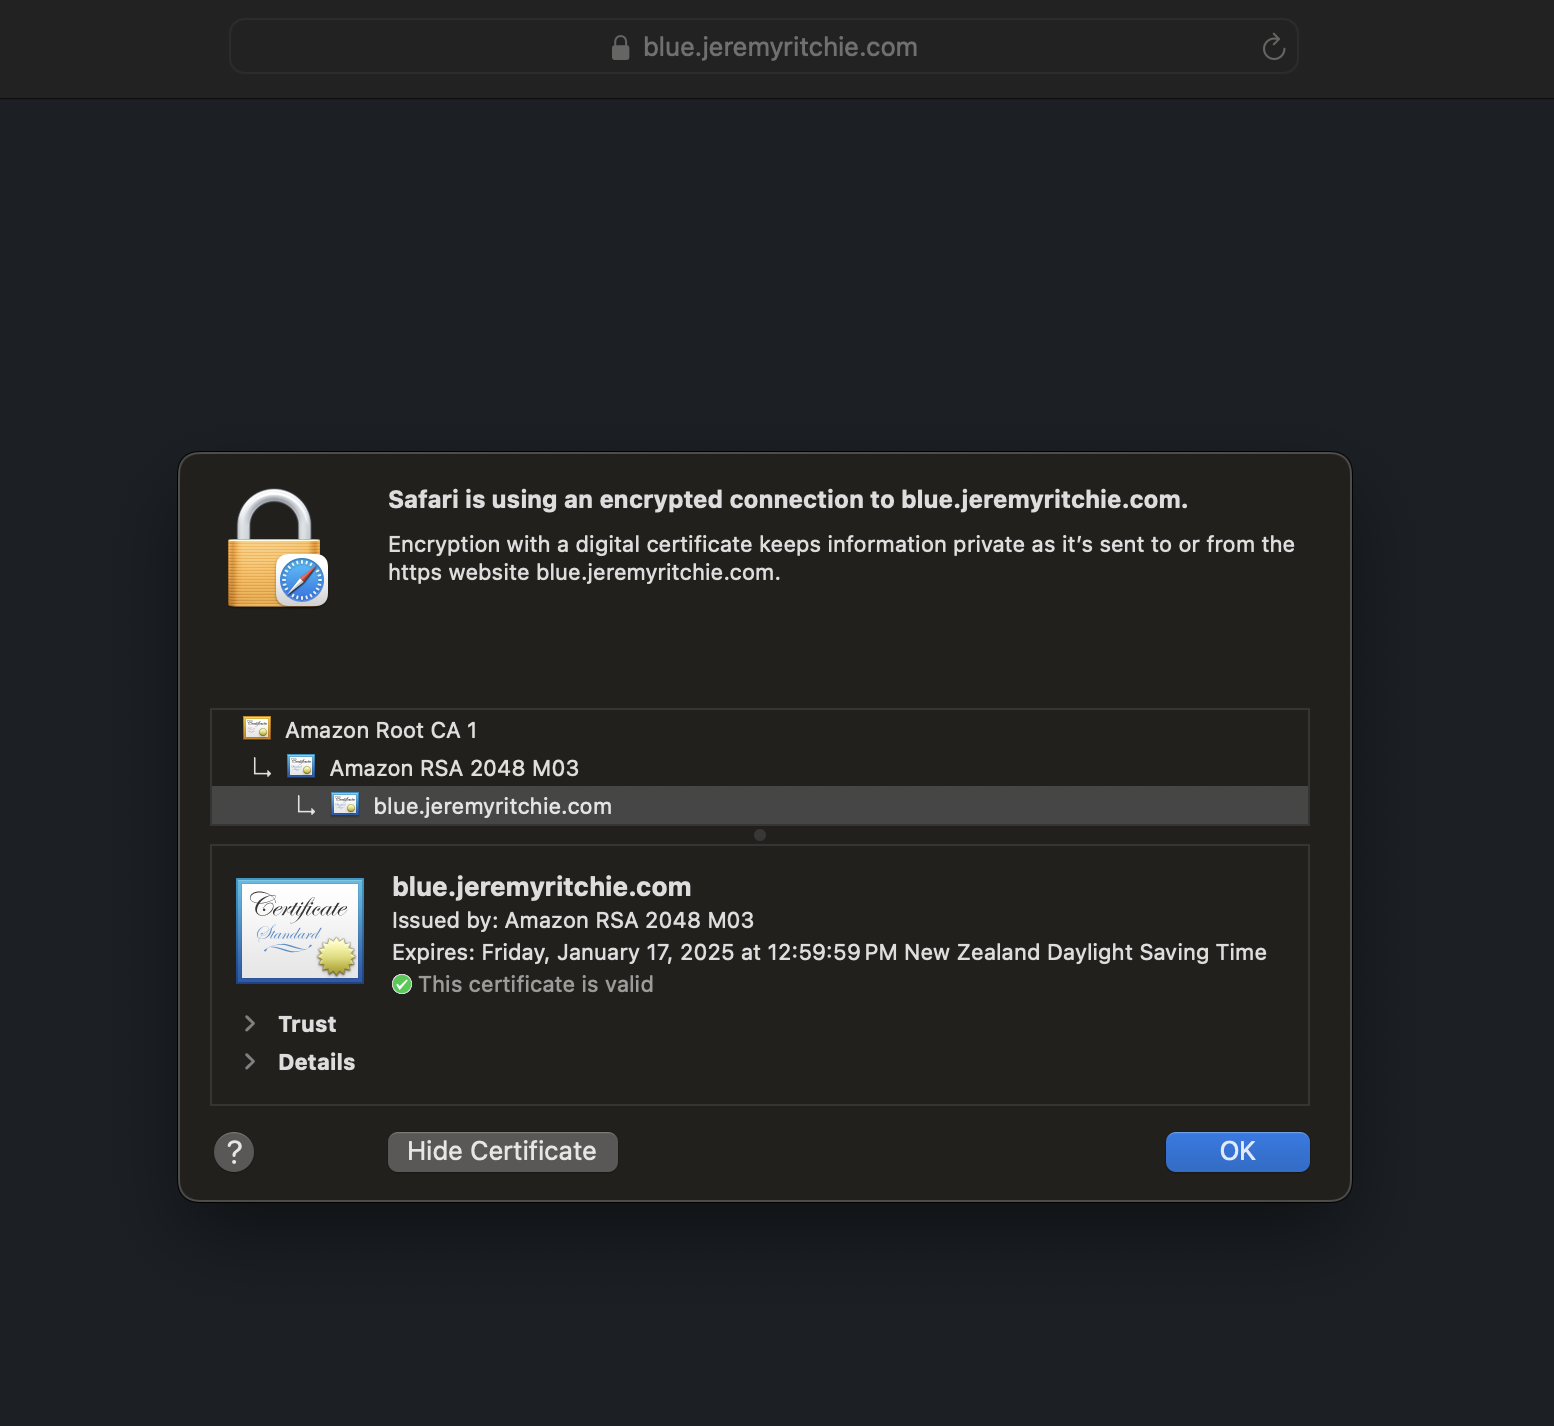

Fantastic!
We’re running two unique websites on a single host, with a single ALB, with each website having a unique SSL/TLS certificate.
Conclusion
SNI support in AWS Application Load Balancers unlocks simpler, flexible shared infrastructure for lift and shift migrations. By consolidating apps onto common EC2 instances, companies can optimize their cloud architecture while benefiting from the elasticity and availability of AWS.

